
防弾チョッキ(ボディアーマー)は、銃弾や爆発による破片から身を守るのに役立ちます。
しかし、いくら防弾性能が高くても素材が重すぎるなら、実用には至りません。
そこで、米ウィスコンシン大学マディソン校(University of Wisconsin-Madison)物理学部に所属するラマササン・ザバマラン氏ら研究チームは、「ナノファイバーマット」と呼ばれる新しい超軽量装甲材料を開発しました。
この素材は非常に軽く、鋼鉄やケブラーよりも優れた防弾性能をもっているとのこと。
⇧防弾性能が向上するのは素晴らしいことだと思うのですが、耐火性能の分野ってどうなってるんだろうか?
というのも、前に、

⇧ という映画を観て、「防火テント」という存在を知ったのだけど、どれぐらいの耐火性能があるのかってのが気にはなってたのよね。
耐熱服は,一般防火服では耐えられない高熱環境のもとで着用する特殊防火服であり,最近では火災様相の変化から,その使用が次第に増えている。
https://www.tfd.metro.tokyo.lg.jp/hp-gijyutuka/shyohou2/06/06-03.pdf
⇧『耐熱服の防熱性について[消防科学研究所報 6号(昭和44年)]』についてという資料によると、耐火性能的には、
という関係になるそうな、「一般防火服」の範囲が分からんので何とも言えませんが。
⇧ 消防隊員が着用する防火衣でさえ、1000度の熱量に曝された場合に耐えられる時間は微々たるものらしい。
例の如く、冒頭からまったく関係のない話でしたが、今回は、Postmanというツールについてです。
レッツトライ~。
Postmanとは?
公式の説明を確認してみると、
Postman is an API platform for building and using APIs. Postman simplifies each step of the API lifecycle and streamlines collaboration so you can create better APIs—faster.
⇧ API platformって言われてもね...
Wikipediaさんによりますと、
Postman is an application that allows the testing of APIs. The software was created in 2012 by Abhinav Asthana, Ankit Sobti and Abhijit Kane in Bangalore in order to solve the API tests sharing problem. Originally, it was a plugin for Google Chrome, then a rich client, and finally a thin client. It's now used by more than 500,000 companies worldwide and its headquarters is in San Francisco.
⇧ APIのテストができるということらしい、って言われてもね...

⇧ 上記サイト様の図がイメージしやすいのですが、APIにリクエストを行えるということらしい。
Postmanを使うことで何が嬉しいのかと言うと、例えば、サーバーサイドの機能の開発が完了してるけど、フロントエンド側の機能が開発できてない場合に、Postmanでリクエストを送れば、サーバーサイドの機能の動作確認ができるという。
ちなみに、Postman以外にもテストツールは様々あるらしく、
⇧ 上記サイト様が詳しいです。
話が脱線しましたが、Postmanに話を戻すと、

The Postman agent employs a TCP connection using WebSockets to publish and subscribe to a JSON payload that uses our internal collection execution protocol. The above diagram breaks down how the Postman agent works with the agent service to securely route API requests to be executed locally, then also makes sure the response gets routed back to the web application. (Making API calls using Postman in the browser is currently in beta, and so is the Postman agent.)
⇧ Web版でブラウザ経由でリクエストする方法と、
We don’t expect that you’ll immediately move all of your API requests to the web and abandon the relationship you’ve developed with the desktop edition of Postman, but we’d love to explore with you what’s possible when you start separating the different aspects of your API operations.
⇧ デスクトップ版でリクエストする方法とで、2種類の方法が用意されてますと。
勿論、両方使うのも有りだとは思うのですが、使い分けとしては、
- 複数人で共有したい場合
- Web版
- ローカル環境で利用する場合
- デスクトップ版
って感じになるかと。
Postmanを使ってみる
職場の先輩に使い方を教わったので、復習として自分のPCにデスクトップ版のPostmanをインストールして使ってみます。
⇧ 上記サイトにアクセスしてダウンロードできるのですが、
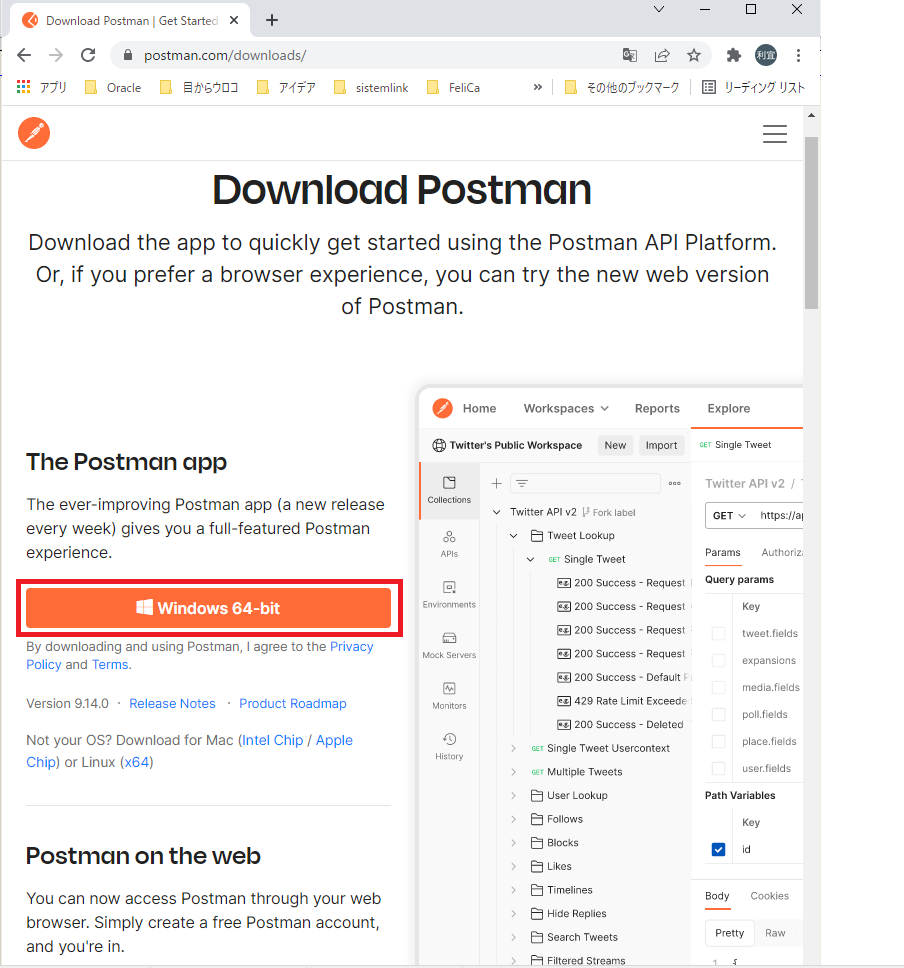
今回は、Windowsの正当なパッケージ管理ツールになるかもしれないという噂の「winget」でインストールしてみます。
「winget」についてのMicrosoftさんの公式のドキュメントは以下。
手前味噌になりますが、
⇧ 上記の記事で、Microsoftさんのwinget-cliのGitHubリポジトリで公開してるソースからインストールする方法を試してます。
「winget」のインストールが済んだら、「winget」で「Postman」がインストールできるのか確認。
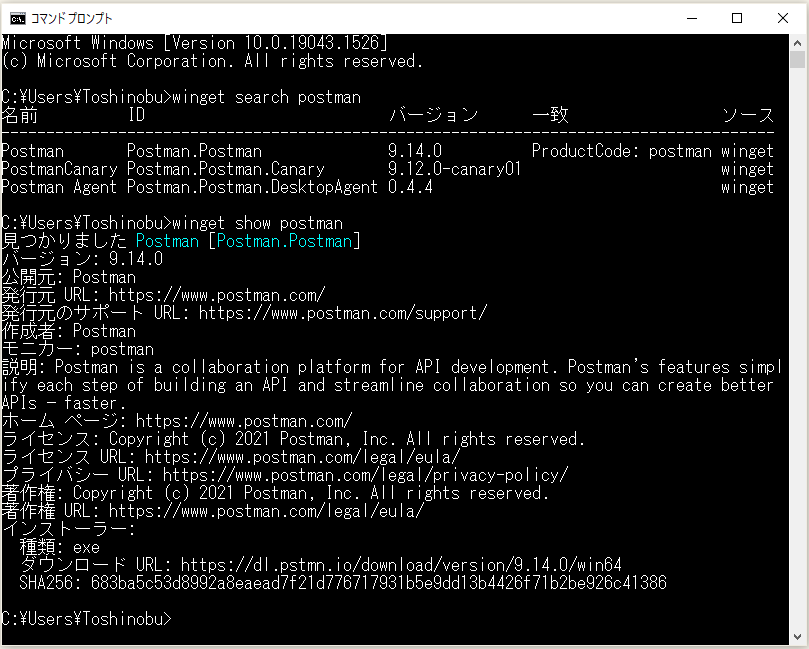
インストールできるようなので、インストールします。
winget ツールの install コマンドは、指定されたアプリケーションをインストールします。 インストールするアプリケーションを特定するには、search コマンドを使用します。
install コマンドでは、インストールする正確な文字列を指定する必要があります。 あいまいさがある場合は、install コマンドを正確なアプリケーションに絞り込むように求めるプロンプトが表示されます。
https://docs.microsoft.com/ja-jp/windows/package-manager/winget/install
⇧ ドキュメントを参考に、インストール。

インストールした場所を教えてくれないという、安定の不親切さ、流石Microsoftさん。
今回はGUIで検索。


「ファイルの場所を開く(F)」を選択。

「タスクバーにピン留めする(K)」しときます。

ピン留めされました。
![]()
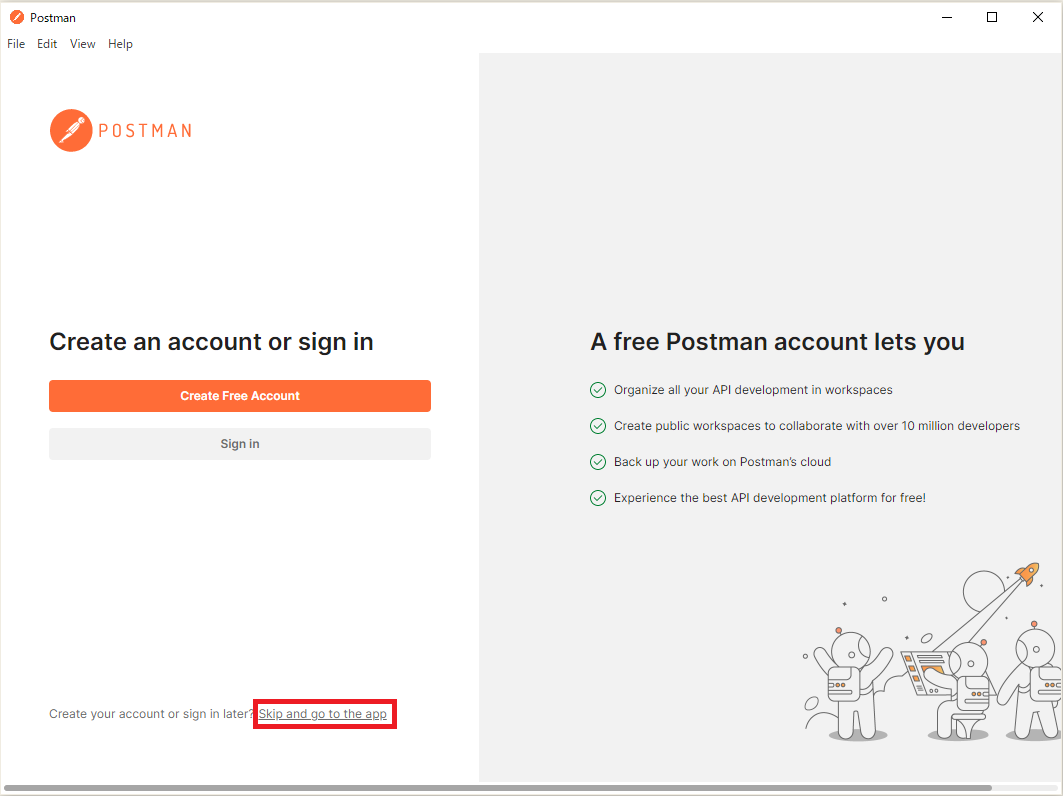
「デスクトップ版」であればアカウント作らなくても利用できるようです。
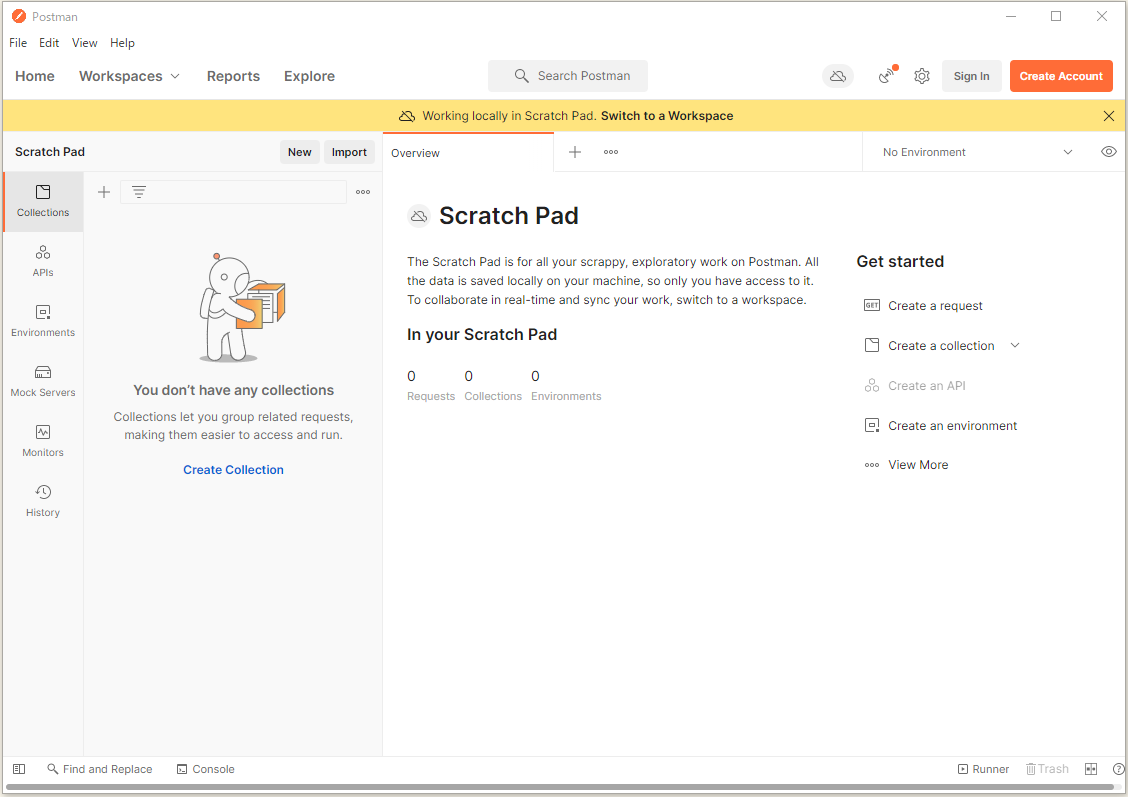
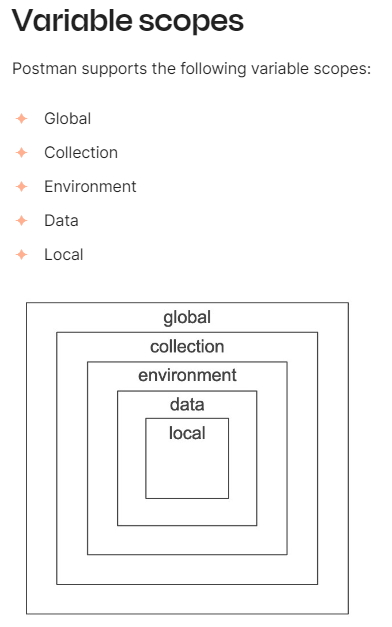
右上の目玉のようなアイコンをクリックして、毎回利用するような変数については設定しておくと良いようです。
で、「Enviroment」と「Global」の2つが用意されているのですが、

公式のドキュメントによりますと、
⇧ なんか無茶苦茶たくさんあるやん?
で、なかなか衝撃的なのが、
If a variable with the same name is declared in two different scopes, the value stored in the variable with narrowest scope will be used—for example if there is a global and a local variable both named username, the local value will be used when the request runs.
https://learning.postman.com/docs/sending-requests/variables/
⇧ 内側のものほど優先されるというね、なんかイメージ的に「global」が一番優先されると思いきや、「local」が一番優先されるという、まさかの下剋上的な様相を醸し出しているという...
そも、「Postman」における「Variable」とは?
Variables enable you to store and reuse values in your requests and scripts. By storing a value in a variable, you can reference it throughout your collections, environments, and requests. If you need to update the value, you only have to change it in one place. Using variables increases your ability to work efficiently and minimizes the likelihood of error.
https://learning.postman.com/docs/sending-requests/variables/
⇧ 変数ということは何となく分かったのだけど、設定する際の項目の説明とかをして欲しいものですね...
まぁ、脱線しましたが、とりあえず、「Enviroment」に設定しておけば良いかと。今回は「app_base_url」って変数を作成して「Save」で保存してます。

続いて、実際にAPIに対するリクエストを作成する必要があるのですが、
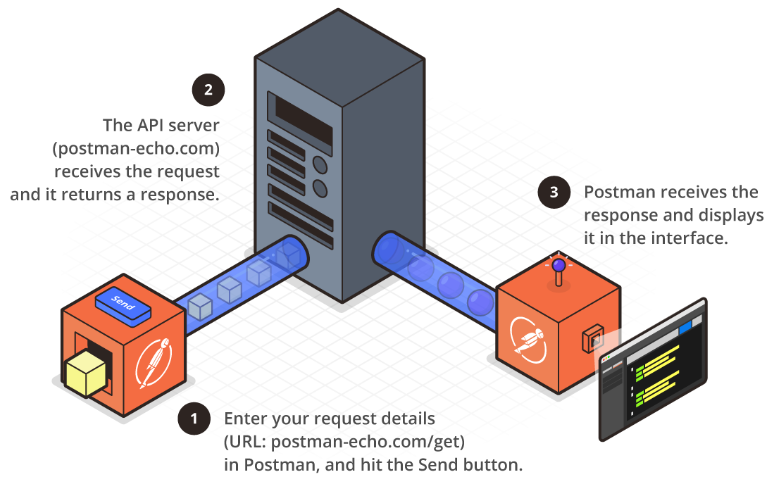
⇧ 上図のような仕組みになってるようです。上図の例は「postman-echo.com/get」のリクエストなので、HTTP通信のGETメソッドで「postman-echo.com」ってドメインにアクセスしてるってことですかね。
ちなみに、利用可能な通信プロトコルとしては、HTTP以外にも「gRPC(gRPC Remote Procedure Calls)」にも対応してる模様。
Those who have been following Postman’s latest releases will know that we’ve been branching out from our roots in HTTP. Already, Postman users enjoy the interoperability of using an API platform that also understands WebSockets, Socket.IO, and GraphQL. But we’re not stopping there! The world’s gRPC developers can celebrate: we are excited to announce first-class support for gRPC in Postman is currently in open beta. You can now test your gRPC APIs with Postman v9.7.1 and above.
⇧バージョン9.7.1から「gRPC(gRPC Remote Procedure Calls)」を使えるとのこと。
バージョンを確認してみると、


⇧ Version 9.14.0 となっているので、「gRPC(gRPC Remote Procedure Calls)」使えるようです。
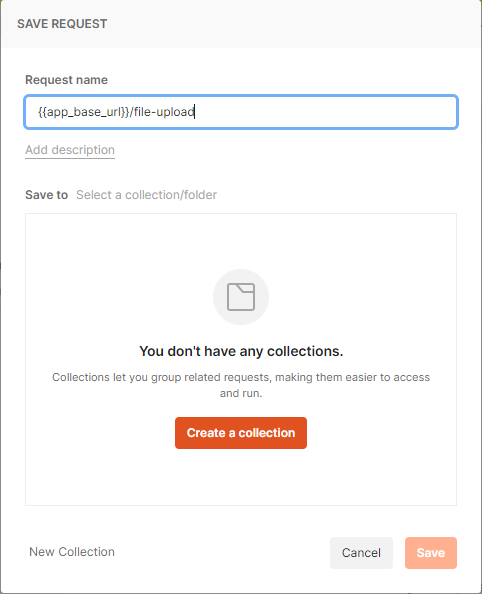
話が脱線しましたが、今回はHTTP通信のリクエストを作成で。サイドバーは「Collections」ってのを選択した状態になっていれば良いかと。「Collections」が選択された状態で「New」ボタンをクリック。

「HTTP Request」を選択。

リクエストが作成されるので、設定していきますと。

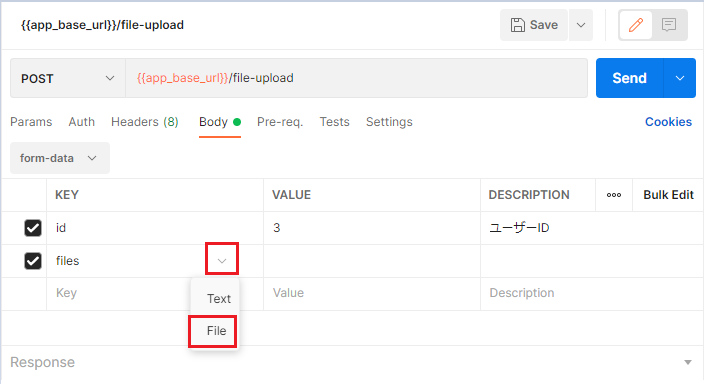
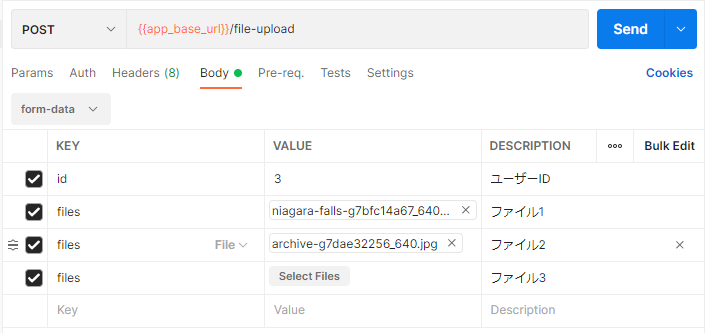
今回は、「multipart/form-data」形式のリクエストにしたいので、以下のように設定し、

そしたらば、リクエストで送りたいデータの項目を設定していきます。その時、ファイルを送りたい場合は、「KEY」のところで「File」を選択する必要があります。
そしたらば、「Select Files」ってボタンが表示されるので、クリックしてファイルをアップロード。


で、今回は複数ファイルのリクエストを試したいので、3ファイルほど設定。

ただ、メッセージが表示されてるので、確認したところ、

Postman This file isn't in your working directory. Teammates you share this request with won't be able to use this file. To make collaboration easier you can setup your working directory in Settings.
⇧「Settings」で「working directory」なるものを設定する必要があるそうな。

ただ、「Working directory」自体は設定されてるんだけどな...Windows特有のフォルダのアクセス権限の問題とかなんかな?
とりあえず、「Allow reading files outside working directory」ってのが「OFF」になってしまっているので、

「ON」にしてみた。

けど、変わらないという...

Working Directoryの説明を確認してみる。
Working Directory
When you send a form-data or binary file with a request body, Postman saves a path to the file as part of the collection. The file path is relative to your working directory. Postman uses ~/Postman/files as the default working directory. To use a different working directory, select Choose and then select the directory you want to use.
Be careful using files located outside your working directory.
To use files located outside your working directory when sending requests, turn on the Allow reading files outside working directory toggle. This option allows third-party collections to potentially read any file on your system. Use caution, and make sure you trust all third-party collections you are using before enabling this option.
⇧う~ん...「Working directory」以外のロケーションのファイルの使用を許可できてないんだけど...
試しに作成中のリクエストを保存してから、

Postman を再起動してみたけど、状況が変わらず...
で、まさかとは思ったけど、「Working directory」にファイルを配置しとかないといけないのか?と思って配置して、

「Select Files」ボタンを押下して、

「Working directory」のファイルを選択したところ、

警告が出なくなりました。
分かり辛過ぎる...ドキュメントに分かるように記載しておいて欲しいですな...
Spring Bootプロジェクトを作成して、Postmanからリクエストを送ってみる
そしたらば、リクエストを受け取る側を作成します。
Eclipseを起動して、「Spring Boot」のプロジェクトを作成で。


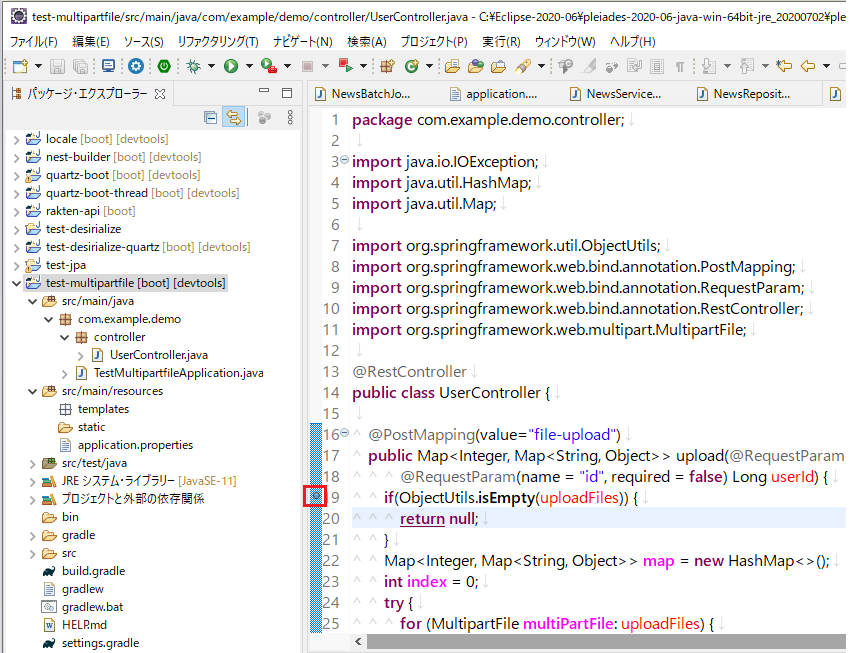
プロジェクトが作成されたら、Controllerクラスを作成。

ファイルの中身は以下のよう感じになりました。
■/test-multipartfile/src/main/resources/application.properties
# ポート番号
server.port=8080

# MULTIPART (MultipartProperties)
# Whether to enable support of multipart uploads.
spring.servlet.multipart.enabled=true
# Threshold after which files are written to disk. Values can use the suffixes "MB" or "KB" to indicate megabytes or kilobytes, respectively.
spring.servlet.multipart.file-size-threshold=0
# Intermediate location of uploaded files.
spring.servlet.multipart.location=${java.io.tmpdir}
# Max file size. Values can use the suffixes "MB" or "KB" to indicate megabytes or kilobytes, respectively.
spring.servlet.multipart.max-file-size=10MB
# Max request size. Values can use the suffixes "MB" or "KB" to indicate megabytes or kilobytes, respectively.
spring.servlet.multipart.max-request-size=10MB
# Whether to resolve the multipart request lazily at the time of file or parameter access.
spring.servlet.multipart.resolve-lazily=false
■/test-multipartfile/src/main/java/com/example/demo/controller/UserController.java
package com.example.demo.controller;

import java.io.IOException;
import java.util.HashMap;
import java.util.Map;

import org.springframework.beans.factory.annotation.Value;
import org.springframework.util.ObjectUtils;
import org.springframework.web.bind.annotation.PostMapping;
import org.springframework.web.bind.annotation.RequestParam;
import org.springframework.web.bind.annotation.RestController;
import org.springframework.web.multipart.MultipartFile;

@RestController
public class UserController {

  @Value("${spring.servlet.multipart.location}")
  private String TEMPOERARY_DIR_LOCATION;

  @Value("${spring.servlet.multipart.location}")
  private String TEMPOERARY_DIR_LOCATION_VALUE = "${java.io.tmpdir}";

  private final static String LINE_SEPARATOR = System.getProperty("line.separator");

  @PostMapping(value="file-upload")
  public Map<Integer, Map<String, Object>> upload(@RequestParam(name = "files", required = false) MultipartFile[] uploadFiles,
      @RequestParam(name = "id", required = false) Long userId) {
    if(ObjectUtils.isEmpty(uploadFiles)) {
      return null;
    }
    System.out.println("■TEMPOERARY_DIR_LOCATION_VALUE: " + LINE_SEPARATOR + TEMPOERARY_DIR_LOCATION);
    System.out.println("■TEMPOERARY_DIR_LOCATION_VALUE_VALUE: " + LINE_SEPARATOR + TEMPOERARY_DIR_LOCATION_VALUE);

    Map<Integer, Map<String, Object>> map = new HashMap<>();
    int index = 0;
    try {
      for (MultipartFile multiPartFile: uploadFiles) {
        if (ObjectUtils.isEmpty(multiPartFile)) {
          continue;
        }
        Map<String, Object> mapValue = new HashMap<>() {
          {
            put("multipartFormName", multiPartFile.getName());
            put("fileName", multiPartFile.getOriginalFilename());
            put("fileSize(byte)", String.valueOf(multiPartFile.getSize()));
            put("bytes", String.valueOf(multiPartFile.getBytes()));
            put("inputStream", String.valueOf(multiPartFile.getInputStream()));
            put("resource", String.valueOf(multiPartFile.getResource()));
          }
        };
        map.put(index++, mapValue);
      }
    } catch (IOException e) {
      // TODO 自動生成された catch ブロック
      e.printStackTrace();
    }
    return map;
  }
}
⇧ 保存します。残念なのは、application.propertiesで設定してる値を@Valueで読み込むときに、final staticな変数にできてないところですかね。
application.propertiesで定義してる値って定数みたいなものだと思うので、Java側でもfinal staticにして変更できない唯一の値にしておきたいんですが、やり方が分からずです...
EclipseでSpring Bootを起動。


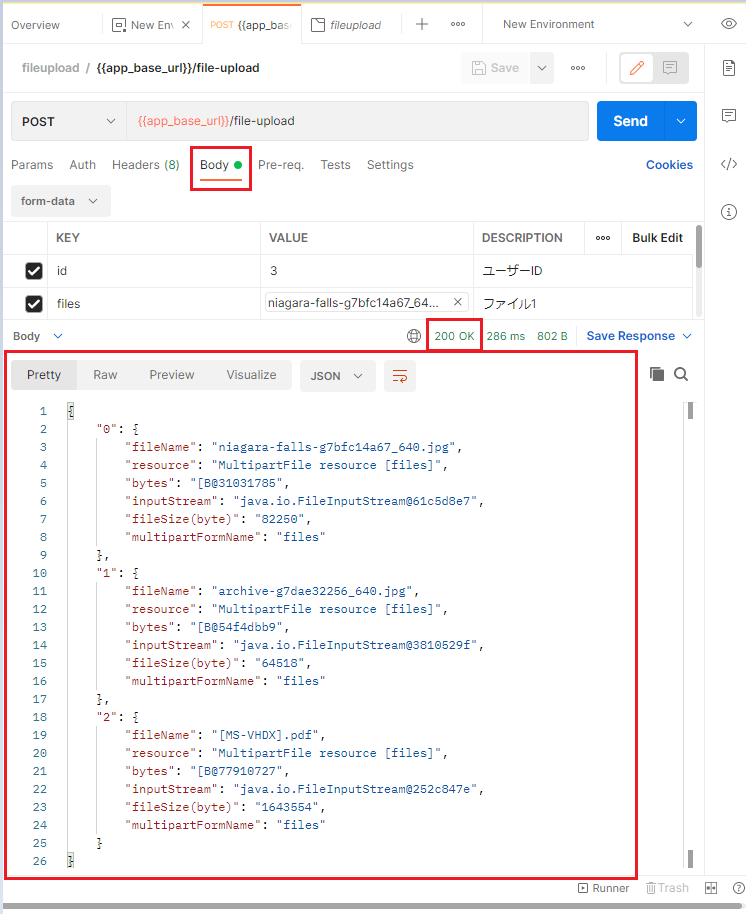
⇧ Tomcatが起動したことを確認し、Postmanでリクエストを送ってみます。

「200 OK」となっていれば、Java側からレスポンスが正常に返ってきてるのでリクエストできてます。
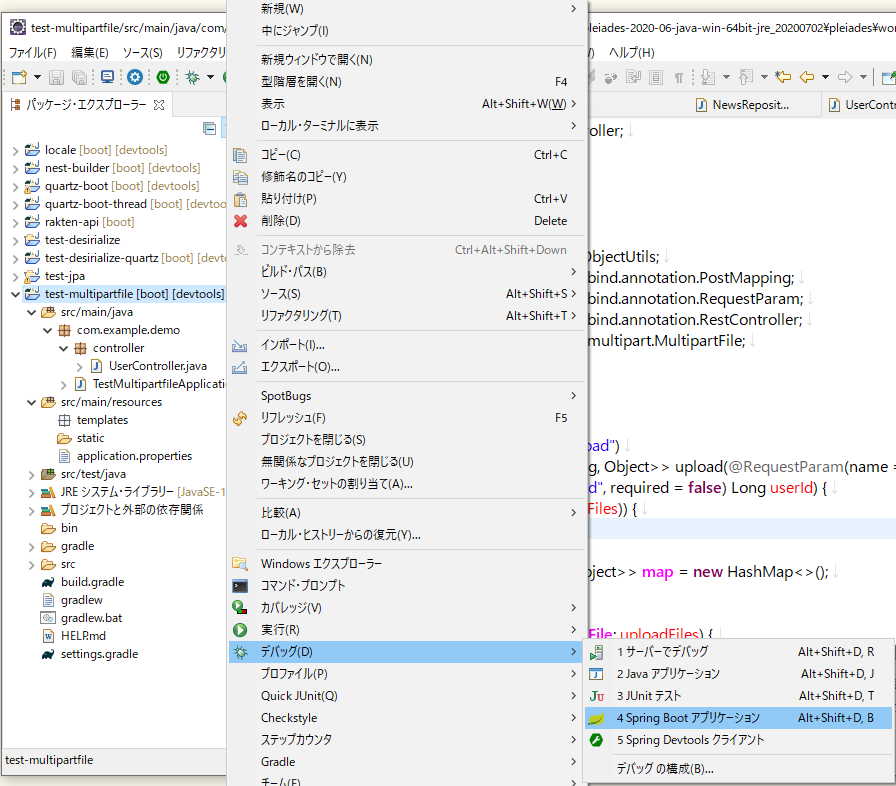
一旦、アプリケーションサーバー(Tomcat)を停止し、

デバッグ実行してみます。
そして、Postmanでリクエストを送信すると、
Eclipseでデバックが開始するダイアログが表示されたら「切り替え(S)」で。

ブレークポイントで処理が止まってくれるので、リクエストで渡ってきたパラメーターの中身が確認できます。

Postmanで複数ファイルを送る方法が今回試した方法で正しいのか分からないですが、動くことは確認できました。
毎度モヤモヤ感が半端ない...
今回はこのへんで。