⇧ 選べな~い、あたいには、選べないぃぃぃぃぃ~...
かどや製油株式会社さんの遊び心~、はい、どうも、ボクです。
ってなわけで、そんな、どっちも好っきやねん、っていう症状を何というでしょうか?
⇧ ブタ野郎~!まったく、モテる輩はこれだから...ブタ野郎~!大事なことなので2回言ってみました。
ところで、
⇧ JJUG CCC 2019 Fall に行ってきましたよ~。
さっそく、まとめてくださってる方がおりました。
プロダクション環境におけるアプリケーションのマイクロサービス化、サーバレス化ってものが徐々に進んでいて、それを実現する技術も成熟してきたと。
GraalVMの性能が鍵を握りそうですとも。
いや~、勉強することがどんどん増えてゆく...
技術系のイベントに参加すると、登壇者やボランティアの方々、スポンサーの企業の努力に頭が下がりますかね。
はい、そんなわけで、今回は、世間一般では二股はNGですが、2つとも選んで大丈夫という2WaySQLってものについてです。レッツトライ~。
この記事は、2019年11月9日(土)ぐらいから書き始めたので、およそ、1ヵ月...どんなけ泥沼にハマってるんだよって感じですかね(涙)。
お時間ある方のみ、ご照覧ください。
2WaySQLって?
残念ながら、Wikipediaさんが扱ってないという...
2WaySQLの1つである、uroboroSQLのサイトで、
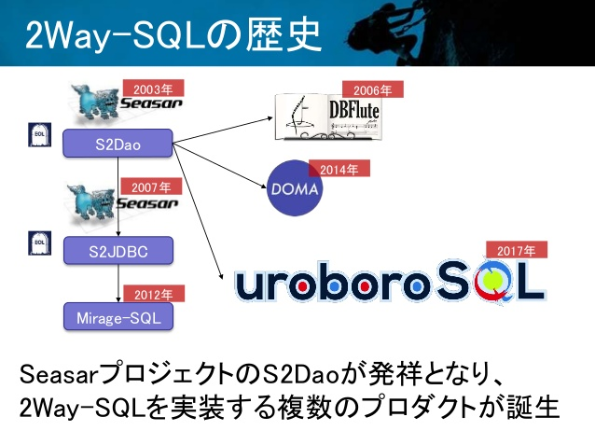
⇧ 紹介されてたのですが、日本発祥のフレームワークである Seasar の S2Dao が起源らしいですと。日本独自の文化らしい、和の心!
『シーザァアアアアアア―――――ッ!(【ジョジョの奇妙な冒険 - 第二部 ジョセフ・ジョースター ―その誇り高き血統「10巻、93話:シーザー最期の波紋の巻」 】)』
ちなみに、Seaser の読み方は、『シーサー』ですかね。
というわけで、Seaserは、
⇧ 上記サイト様によりますと、いろんなものに影響を与えてるらしいですと。
んで、2WaySQLって、具体的にどんなものなのよ?
What's 2WaySQL?
2WaySQL is just a plain old SQL-Template. You can specify parameters and conditions using special SQL comments. This way the template is executable using SQL client tools. This feature is based on the Japanese O/R mapping framework S2JDBC.
⇧ S2JDBC にインスパイアされてるんよと。
S2JDBCって?
⇧ シーザァアアアアアア―――――ッ!
JPAに対して物申す、ってことですかね、まぁ、確かに、Spring Data JPAとかも複雑なSQLになってくると実装が難しくなるんだそうですね...
要するに、2WaySQLってのは、名前の通り、
ってな具合に、2つの使い方ができるよってことらしい。
最近のビジネスバッグは、3way とかも出てますけどね...はい、すみませんでした。
2WaySQLに拘らず、SQLテンプレートってのは、
⇧ 「Velocity」ってのが有名だったらしい。(今も新規プロジェクトで使われるのかは分かりません。)
Spring Boot で、Doma 2系を使ってみる
そんな、2WaySQLですが、Java だと、Doma 2系ってのがイケてるらしいですと。
というわけで、Spring Boot のプロジェクトで試してみました。
Doma 2系については、
⇧ 公式のドキュメントがあるっぽいです。
⇧ 上記サイト様を参考にさせていただきました。
んで、Doma 2系を使う場合は、
の2つを組み合わせるのが一般的?みたいです。
Doma-Gen-2については、
Doma-Gen 2 is a code generation tool for Doma 2.
Doma-Gen will generate:
Doma-Gen is an Ant task, which can be used by many build tools such as Ant and Gradle.
Doma-Gen generates various files using FreeMarker. You can customize all generation code by changing FreeMarker template files.
⇧ ってことらしい。日本発祥なんだから、ドキュメントを英語にしなくたって良いじゃないって思うんだけど、データベースの情報から、Javaファイルを生成してくれるんだと、要するにORMを自動でやってくるってことかと。
今回の手順としては、事前にデータベースを用意しておくとして、
- Spring Bootのプロジェクト作成
依存関係 - Doma 2系を使うための依存関係の追加、設定ファイルを用意
- doma
- doma-spring-boot-starter
- doma-gen ← ファイルの自動生成とか。
- freemarker ← 親Pomで定義されてました、あと、doma-gen でfreemarkerって使われてるから、別途依存関係への追加は不要っぽい
- Doma Tool(Eclipseプラグイン)追加 ← 必須ではないらしい
- プロジェクトの注釈処理の設定
- Doma-Gen でファイルの自動生成
みたいな流れになるかと。(よく分からんですが、doma-gen 無くてもファイルの自動生成やってくれそうです。)
※ 2019年12月8日(日)現在、Domaのバージョンは、1系、2系が存在するようです。今回は、2系を使います。
そんでは、作業していきますか。
まずは、データベースをDockerコンテナで用意しておきます。今回は、みんな大好きMySQLのコンテナを用意で。
なので、Dockerを使える環境を用意してない人は用意しちゃいましょう。
ちなみに、私の環境は、Windows 10 Home なので、Docker ToolBox、Virtual Box の組み合わせです。
今回は、docker-compose コマンドで、コンテナを生成しようと思うので、
⇧ 上記サイト様を参考にさせていただきました。
「Data Volume」とかは、docker-compose.yml で指定したものが、自動的に生成されるっぽいです。
logファイルがマウントされないっぽかったので、
And update your docker-compose with below settings
    entrypoint: ""
    command: bash -c "chown -R mysql:mysql /var/log/mysql && exec /entrypoint.sh mysqld"
docker - Mount logs of mysql container in host directory - Stack Overflow
⇧ 上記サイト様を参考にさせていただきました。
docker-compose する用のファイル群を用意。

一応、ファイルの中身を。
C:\Users\Toshinobu\Desktop\soft_work\docker_work\dockerMysql\docker-compose.yml
version: "3"
services:
  db:
    image: mysql:latest
    volumes:
      - db-store:/var/lib/mysql
      - ./logs:/var/log/mysql
      - ./docker/mysql/my.cnf:/etc/mysql/conf.d/my.cnf
    environment:
      - MYSQL_DATABASE=${DB_NAME}
      - MYSQL_USER=${DB_USER}
      - MYSQL_PASSWORD=${DB_PASS}
      - MYSQL_ROOT_PASSWORD=${DB_PASS}
      - TZ=${TZ}
    ports:
      - ${DB_PORT}:3306
    entrypoint: ""
    command: bash -c "chown -R mysql:mysql /var/log/mysql && exec /entrypoint.sh mysqld"

  db-testing:
    image: mysql:latest
    volumes:
      - ./docker/mysql/my.cnf:/etc/mysql/conf.d/my.cnf
    tmpfs:
      - /var/lib/mysql
      - /var/log/mysql
    environment:
      - MYSQL_DATABASE=${DB_NAME}
      - MYSQL_USER=${DB_USER}
      - MYSQL_PASSWORD=${DB_PASS}
      - MYSQL_ROOT_PASSWORD=${DB_PASS}
      - TZ=${TZ}

volumes:
  db-store:
C:\Users\Toshinobu\Desktop\soft_work\docker_work\dockerMysql\.env
DB_NAME=mysql8
DB_USER=ts0818
DB_PASS=mysql
DB_PORT=13306
TZ=Asia/Tokyo
「"C:\Users\Toshinobu\Desktop\soft_work\docker_work\dockerMysql\docker\mysql\my.cnf"」は、参考サイト様と同じ内容なので割愛。
Windowsで、「.〇〇」なファイルを作成する方法は、
⇧ 上記サイト様を参考にさせていただきました。
そんじゃ、仮想マシンを起動で。(仮想マシンが無い場合は、適当に作成しちゃいましょう。)


んで、docker-compose.yml のあるディレクトリに移動し、
docker-compose up -d

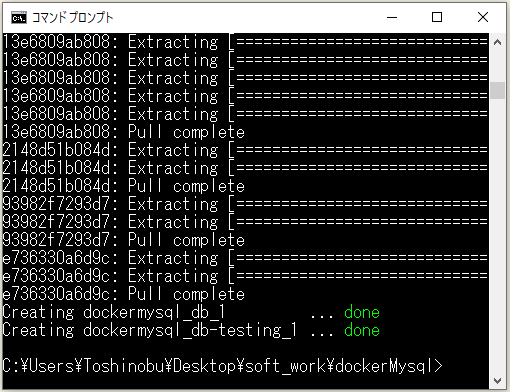
docker ps または、docker-compose ps でコンテナが起動できてるか確認できます。
コンテナにログインしてみたところ、無事、mysqlのログファイルもありました。

MySQLにもログインできたので、動いてそうですね。


⇧ データベースも、「.env」で設定したものが作成されてるので、MySQLの準備は問題なさそうです。
2019年12月8日(日)追記:↓ ここから
どうも、volumes のマウントの設定が上手くいってないのか、分からんのだけれど、仮想マシンを再起動して、コンテナを再起動しようとすると、エラーになってしまう。
Restarting dockermysql_db-testing_1 ... error                                                                                                                                                                      Restarting dockermysql_db_1         ... error
ERROR: for dockermysql_db-testing_1  Cannot restart container ead32dac20048e865c79f2591169cd3c7dec5d2028aa6cb7bfe691e048fda660: OCI runtime create failed: container_linux.go:346: starting container process caused "process_linux.go:449: container init caused \"rootfs_linux.go:58: mounting \\\"/c/Users/Toshinobu/Desktop/soft_work/dockerMysql/docker/mysql/my.cnf\\\" to rootfs \\\"/mnt/sda1/var/lib/docker/overlay2/392ff2d86df064e10ef28e2d177eb4aaf4cad3bccc56bb80c0c03ccd9a1282cb/merged\\\" at \\\"/mnt/sda1/var/lib/docker/overlay2/392ff2d86df064e10ef28e2d177eb4aaf4cad3bccc56bb80c0c03ccd9a1282cb/merged/etc/mysql/conf.d/my.cnf\\\" caused \\\"not a directory\\\"\"": unknown: Are you trying to mount a directory onto a file (or vice-versa)? Check if the specified host path exists and is the expected type

ERROR: for dockermysql_db_1  Cannot restart container 41adf69fdabdd70f4240fc9555fd1f533e244b32e9b18db1d48ab89ded820ed1: OCI runtime create failed: container_linux.go:346: starting container process caused "process_linux.go:449: container init caused \"rootfs_linux.go:58: mounting \\\"/c/Users/Toshinobu/Desktop/soft_work/dockerMysql/docker/mysql/my.cnf\\\" to rootfs \\\"/mnt/sda1/var/lib/docker/overlay2/f3a3a232a958bc60bcffc7ce5c92f3c745abfb7966c95e9878bba6e0817cd47f/merged\\\" at \\\"/mnt/sda1/var/lib/docker/overlay2/f3a3a232a958bc60bcffc7ce5c92f3c745abfb7966c95e9878bba6e0817cd47f/merged/etc/mysql/conf.d/my.cnf\\\" caused \\\"not a directory\\\"\"": unknown: Are you trying to mount a directory onto a file (or vice-versa)? Check if the specified host path exists and is the expected type
なんか、
⇧ 仮想マシンの共有フォルダの設定じゃないかと仰っている人がおられたので、チェックしてみた。Docker ToolBoxの場合は、Virtual Boxマネージャーで見れるらしい。

「共有フォルダー」 の設定できるらしい。

⇧ Docker ToolBoxのマウントできるディレクトリが、「C:\Users」配下のディレクトリに限定されるっていうのは、こういう理由なのかな?
まぁ、今回は、マウントしてるディレクトリが、「C:\Users\Toshinobu\Desktop\soft_work\docker_work\dockerMysql」に属するディレクトリなので、条件に合っている気がするんだが...
原因が分からず、一旦、コンテナ削除して、コンテナ再作成しました、毎回初期化してるデータベースになってしまっているという...意味ねぇ~、解決できず面目ねぇ~。
2019年12月8日(日)追記:↑ ここまで
1.Spring Bootのプロジェクト作成
Eclipseを起動して、「ファイル(F)」>「新規(N)」>「その他(O)...」で。

「Spring Boot」>「Spring スターター・プロジェクト」を選択で、「次へ(N) >」

「名前」を適当に入力し、「次へ(N) >」。(「型:」は、Gradle にしたほうが良かったかも...あとで変換することになるので)

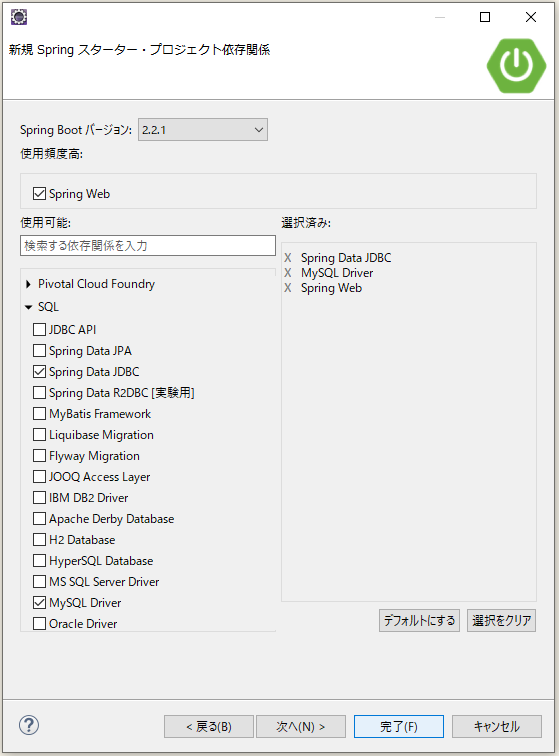
以下の依存関係を追加します。「完了(F)」で。
2. Doma 2系 を使うための依存関係を追加、設定ファイルを用意
今回はビルドツールにMavenを使ってるんですが、Doma-gen を実行できるのは、
- Ant
- Gradle
のどっちか(どっちも最近のEclipseには内蔵されている)を使うしかなく、Antを使う場合は、pom.xml に依存関係を追加すれば良いんだけど、Gradleを使う場合は、build.gradle ってファイルを作って依存関係を追加する感じになると。
Maven、Gradleが全盛の時代にAntは使いたくないけど、MavenとGradleの併用とかってできるのかも分からんし、どうすりゃ良いんじゃ~。
って思ったら、GradleとAntは密接な関係だったとさ...
⇧ そのわりには、ant.sql とかの情報が載ってないっていうね...Antを切り捨てたいのか、継続してAntを利用していく方針なのか、いまいちハッキリしないよね。
とりあえず、Gradleで試してみることに。(地獄の始まりでしたわ...)
なんか、Gradleプロジェクトに変換しないとGradleタスクが実行できないらしい、Gradleメインで生きていったほうが良いのか...これ気づかずにむっちゃ時間浪費したしね(涙)。変換方法については、
⇧ 上記サイト様を参考にさせていただきました。
残念ながら、Eclipse 内蔵のGradleは、コマンド実行できるようになってないので、Gradleを別途インストールするしかないかと。
インストールされてたみたいだけど、バージョンが旧いし...

chocolatey でインストールしてたんで、アップグレードしました。(chocolateyを使うには、chocolateyをインストールする必要があります。)


コマンドプロンプトを新たに開いて、更新できるてことを確認。

んじゃ、MavenプロジェクトをGradleプロジェクトへ変換。
gradle init --type pom -PjavaVersion=1.11 -Dorg.gradle.java.home=[JAVA_HOME]

んで、どう頑張っても、出来上がるbuild.gradleのJavaのバージョンが、1.8 になってしまう...Eclipse 2019-09内蔵のAdoptOpenJDKでデフォルトだと、バージョン11なはずなんだけど...
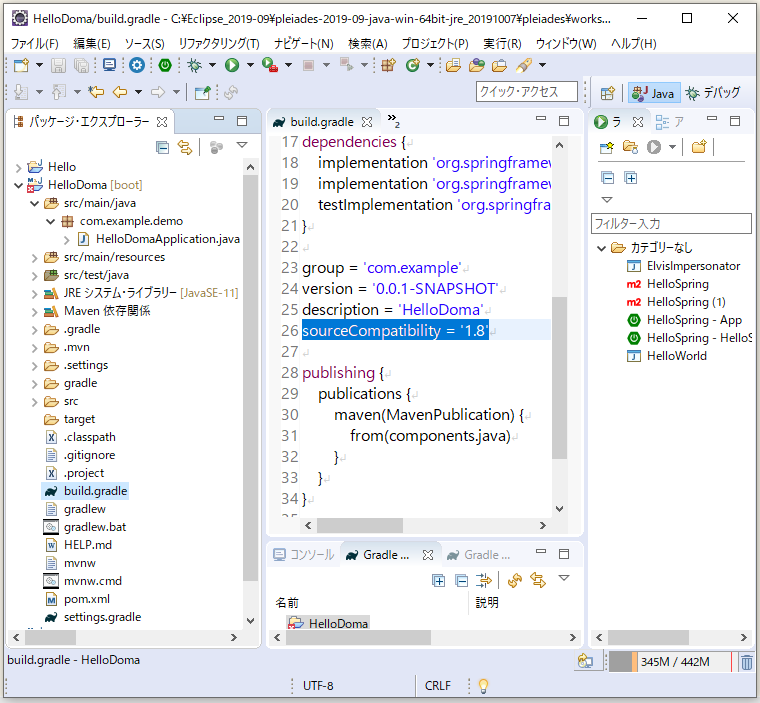
どうやら、元となる、pom.xmlの親pomのJavaのバージョンが、1.8 になってるからじゃないかという気がする...
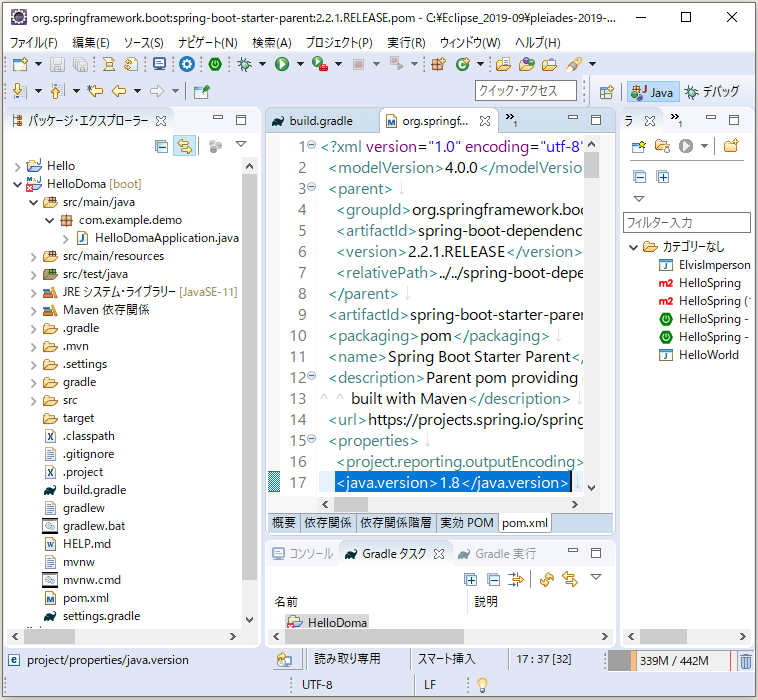
とりあえず、11にしてもエラーが消えず。
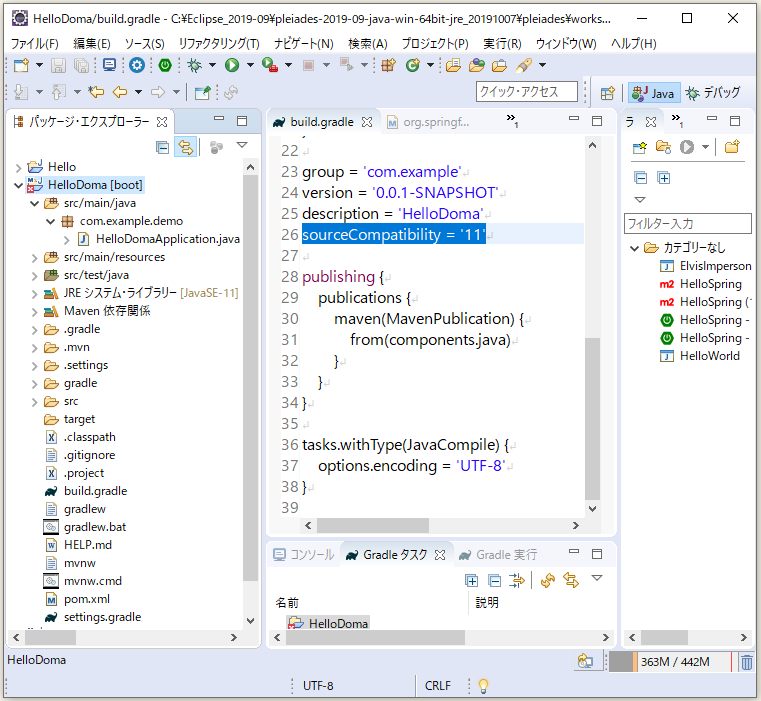
起こられてる内容が、「Gradle プロジェクト構成ファイルの欠落: .settings/org.eclipse.buildship.core.prefs」ってなってるんだけど、
⇧ 上記サイト様によりますと、build.gradle に追加してあげれば良さげらしい。
そして、MavenプロジェクトからGradleプロジェクトへ変換したせいか、自分でGradleタスクの対象プロジェクトを教えてあげる必要があるらしい。
⇧ 上記サイト様を参考に設定。
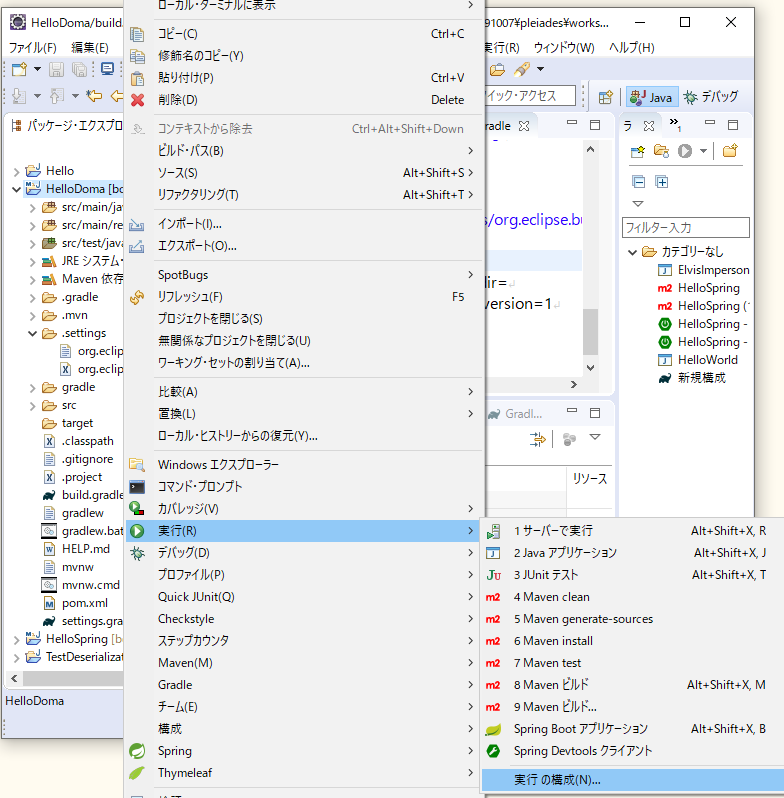
「Gradle Task」で、「Gradle タスク」タブで、「作業ディレクトリー:」に、プロジェクトを指定しました。

「Gradle 実行」は行われたんだけど、

「Gradle タスク」は、変化なし...なんでやねん...ちなみに、「Gradle タスク」が出てない場合は、「ウィンドウ(W)」>「ビューの表示(V)」>「その他(O)...」から、「Gradle 」>「Gradle タスク」で。

⇧ 上記サイト様によりますと、Eclipseに認識されとらんらしい。なんで、build.gradleのplugins に、eclipse を追加。(apply plugin って書き方から変わったらしい)
なんで、以下のように追加して、

コマンドプロンプトとかで、
gradle eclipse
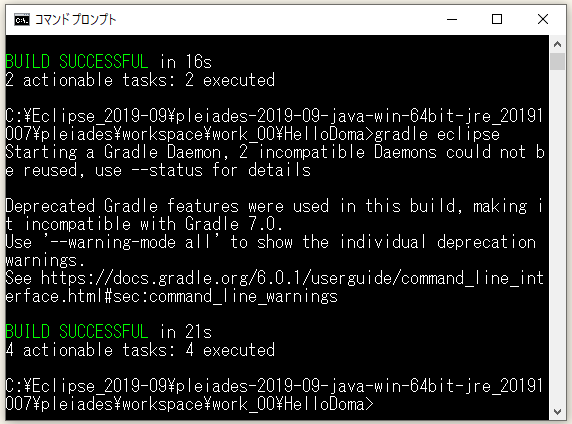
んで、build.gradleのjavaのバージョンを修正で。
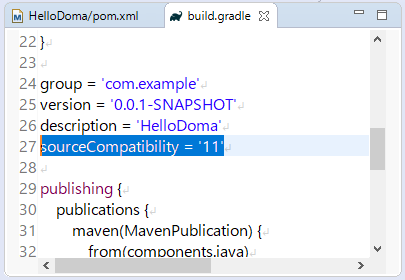
漸く、Gradleプロジェクトとして整ったようです。
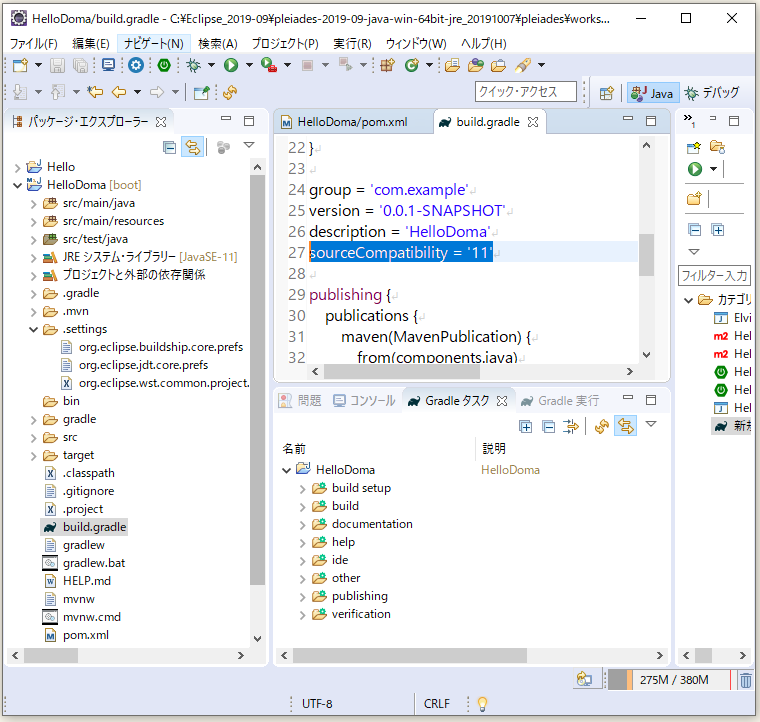
新規プロジェクトとかの場合は、まず、「Maven」でいくのか「Gradle」でいくのか、または違うビルドツールでいくのか、事前に決めたほうが良いですね、途中で変換はシンドイ(涙)。
そんでは、本題に戻ってきたということで。
依存関係を追加、なんですが、通常の、Doma 2系と、
Spring Boot 用の Doma 2系があるのですが、
⇧ どっちも入れといた方が良いようです。この記事でページ下部に「NG集」を載せてますが、自分は、これに気づかず、「doma-spring-boot-starter」を依存関係に追加せず1ヵ月ぐらい試行錯誤してました(涙)。
⇧ 上記サイト様で知りました。
datasource.gradle、schema.sql、data.sql、application.yml を追加。

んで、 ファイルを編集。値とかは、ご自分の環境に合わせてください。
spring:
  datasource:
    url: jdbc:mysql://localhost:13307/mysql8
#?allowPublicKeyRetrieval=true&useSSL=false
    username: ts0818
    password: mysql
    driver-class-name: com.mysql.cj.jdbc.Driver
# ↓MySQL に接続できなくなる場合の対策
    tomcat:
      testWhileIdle: true
      timeBetweenEvictionRunsMillis: 60000
      validationQuery: SELECT 1

# ↓明示的に初期化を指定しないと、テーブルの初期化とかしてくれない
    initialization-mode: always
# ↓ Doma の設定
# 有効な値:  [DB2, H2, HSQL, MSSQL, MSSQL2008, MYSQL, ORACLE, POSTGRES, SQLITE, STANDARD, db2, h2, hsql, mssql, mssql2008, mysql, oracle, postgres, sqlite, standard]
doma:
  dialect: mysql
# 有効な値: [GREEDY_CACHE, NO_CACHE, greedy-cache, no-cache]
  sql-file-repository: no-cache
なんか、Spring Bootで yamlファイルのプロパティのフォーマットが、kebab-case になったせいで、gradleファイルの中で、「.」で変数を繋げていくのでエラーなっちゃう部分が出てきたんだけど、
Groovy公式ドキュメントでもこの「展開ドット演算子の代入用法」について説明がないので、若干不安なところではありますが、かなり初期の頃からあった隠し仕様のようなので突然廃止されることはないと思います。まあ、その辺はひとつ自己責任でお願いいたします。
⇧ 上記サイト様によりますと、「展開ドット演算子」っていうらしい。
つまり、
ext.driver = yamlObj.spring.datasource.driver-class-name
みたいな書き方ができない...「driver-class-name」みたいにハイフンが含まれたプロパティが処理できないらしい...なんで、Springは、yamlのフォーマットをkebab-case にしたんですかね、Javaのフィールドとも相性良くないでしょうに...
snakeYaml ライブラリ側で対応するのか、Groovy側で対応するのか、どっちにしろSpringの取った方針は迷惑な話 でしかないんですがね。
致し方ないので、ハイフン含むプロパティについては、値を直で代入という...
import org.yaml.snakeyaml.*

buildscript {
    repositories {
        mavenCentral()
    }
    dependencies {
        classpath("org.yaml:snakeyaml:1.25") // ← snakeyaml-1.25.jar を「.gradle」ファイルで使えるように、依存関係、クラスパスに追加
    }
}

task datasource {
    Yaml parser = new Yaml() // ←snakeYamlで、Yamlのインスタンスを使うことで、「.yml」ファイルを扱う
    ant.loadfile ( // doma-genがantのタスクを使うので、そこで利用できる設定を準備
        srcfile: 'src/main/resources/application.yml',
        property: 'yaml'
    )
    // ↓ant.loadfile() で設定した内容で、「.yml」の中身を、groovy で扱えるようにする(Javaでもいける)
    def yamlObj = parser.load("${ant.properties.yaml}")
    // ↑データ型を指定しない場合は、load()で。その場合は、class java.util.LinkedHashMap がデフォルトらしい。
    // ↓データ型を指定する場合は、loadAs() を使うらしい。
    // def yamlObj = parser.loadAs("${ant.properties.yaml}", java.util.LinkedHashMap.class) // ←データ型を指定もできる
    // println "yamlObjのクラス:" + yamlObj.getClass() // ←出力結果:class java.util.LinkedHashMap
    // println parser.dump(yamlObj)

    //↓groovyの 「展開ドット演算子」ってので、入れ子になった変数にアクセスできるらしい
    ext.url = yamlObj.spring.datasource.url // ←application.ymlの「spring.datasource.url」プロパティの値を設定
    ext.user = yamlObj.spring.datasource.username // ←application.ymlの「spring.datasource.username」プロパティの値を設定
    ext.password = yamlObj.spring.datasource.password // ←application.ymlの「spring.datasource.password」プロパティの値を設定
    // ↓Springが、yamlのプロパティのkebab-caseなフォーマットにしたせいで、snakeYamlが対応してないので、値を直に設定
    ext.driver = "com.mysql.cj.jdbc.Driver" // ←application.ymlの「spring.datasource.driver-class-name」プロパティの値を設定
}
/*
 * This file was generated by the Gradle 'init' task.
 */

plugins {
    id 'java'
    id 'maven-publish'
    id 'eclipse'
}

repositories {
    mavenLocal()
    maven {
        url "http://repo.maven.apache.org/maven2"
    }
    maven { // Doma-Gen-2 の依存関係の取得先リポジトリ
        url "https://oss.sonatype.org/content/repositories/snapshots/"
    }
}

configurations { // Doma-Gen-2 のタスクを登録(build.gradleファイル内で使えるようにかと)
    domaGenRuntime
}

dependencies {
    def springBootVersion = "2.2.1.RELEASE"
    def mysqlVersion = "8.0.18"
    implementation (
        "org.springframework.boot:spring-boot-starter-data-jdbc:${springBootVersion}",
        "org.springframework.boot:spring-boot-starter-web:${springBootVersion}",
    )
    testImplementation "org.springframework.boot:spring-boot-starter-test:${springBootVersion}"
    implementation "mysql:mysql-connector-java:${mysqlVersion}"

    // Generating Your Own Metadata by Using the Annotation Processor
    // ⇩Doma2で、「Doma uses Pluggable Annotation Processing API at compile time.」ってあるので、不要かな?
    // annotationProcessor "org.springframework.boot:spring-boot-configuration-processor:${springBootVersion}"

    // Doma2 に必要な依存関係を追加
    def domaVersion = "2.25.1"
    def domaSpringVersion = "1.2.1"
    annotationProcessor "org.seasar.doma:doma:${domaVersion}"
    implementation "org.seasar.doma:doma:${domaVersion}"
    // Doma2 をSpring Bootで使う際の依存関係を追加
    implementation "org.seasar.doma.boot:doma-spring-boot-starter:${domaSpringVersion}"
    // Doma-Gen-2 に必要な依存関係を追加
    domaGenRuntime "org.seasar.doma:doma-gen:${domaVersion}"
    domaGenRuntime "mysql:mysql-connector-java:${mysqlVersion}"

}

group = 'com.example'
version = '0.0.1-SNAPSHOT'
description = 'HelloDoma'
sourceCompatibility = '11' // ← Eclipseの実行JDKのバージョンに合わせました

//compileJava.dependsOn(processResources)

publishing {
    publications {
        maven(MavenPublication) {
            from(components.java)
        }
    }
}

tasks.withType(JavaCompile) {
    options.encoding = 'UTF-8'
}

tasks.eclipse.doFirst {
    File prefs = file(".settings/org.eclipse.buildship.core.prefs")
    if(!prefs.exists()){
        prefs.append('''
            connection.project.dir=
            eclipse.preferences.version=1
            '''.stripIndent())
    }
}

apply from: 'gradle/datasource.gradle'
// JavaクラスとSQLファイルの出力先ディレクトリを同じにする
processResources.destinationDir = compileJava.destinationDir
// Doma-Genでコンパイルより前にSQLファイルを出力先ディレクトリにコピーするために依存関係を逆転する
compileJava.dependsOn processResources

task gen { // doma-genって定義したRuntimeタスクに、genって実タスクを作成
    group = 'doma-gen'
    doLast {
        // ↓パッケージは各々の環境に合わせてください
        def destBaseDir = 'src/main/java/com/example/demo'
        def basePackage = 'com.example.demo.domain'
        def resourceDir = 'src/main/resources'

        ant.taskdef(resource: 'domagentask.properties',
            classpath: configurations.domaGenRuntime.asPath)
         // Doma-Gen のタスク前に、テーブルが無かったら作成
         // ↓ Gradleの公式ドキュメントで、ant.sql の情報が無い...もはや過去の遺産?
        ant.sql(classpath: configurations.domaGenRuntime.asPath,
            driver: "${datasource.driver}",
            url: "${datasource.url}",
            userid: "${datasource.user}",
            password: "${datasource.password}") {
                fileset(dir: "${resourceDir}") {
                  include(name: "schema.sql")
                  //include(name: "data.sql") // ←ファイルの実行順とか制御できないっぽい...
                }
            }
        ant.sql(classpath: configurations.domaGenRuntime.asPath,
            driver: "${datasource.driver}",
            url: "${datasource.url}",
            userid: "${datasource.user}",
            password: "${datasource.password}") {
                fileset(dir: "${resourceDir}") {
                  //include(name: "schema.sql")
                  include(name: "data.sql")
                }
            }
       ant.gen(url: "${datasource.url}", user: "${datasource.user}", password: "${datasource.password}", templatePrimaryDir: "${resourceDir}/config/doma/templates", tableNamePattern: 'mst_role') {
            entityConfig(packageName: "${basePackage}.entity", useAccessor: false, useListener: false)
            daoConfig(packageName: "${basePackage}.dao", overwrite: true)
            sqlConfig()
        }
    }
}
CREATE DATABASE IF NOT EXISTS mysql8;
USE mysql8;
CREATE TABLE IF NOT EXISTS mst_role
(
    role_id varchar(20) NOT NULL COMMENT '権限ID',
    role_name varchar(100) COMMENT '権限名',
    version int COMMENT 'バージョン',
    insert_user varchar(20) COMMENT '登録ユーザ',
    insert_date datetime COMMENT '登録日時',
    update_user varchar(20) COMMENT '更新ユーザ',
    update_date datetime COMMENT '更新日時',
    PRIMARY KEY (role_id)
) COMMENT = '権限マスタテーブル';
INSERT INTO mst_role (role_id, role_name) values (1, "エーリヒ・ガンマ") on duplicate key update role_id='1', role_name='エーリヒ・ガンマ';
INSERT INTO mst_role (role_id, role_name) values (2, "リチャード・ヘルム") on duplicate key update role_id='2', role_name='リチャード・ヘルム';
INSERT INTO mst_role (role_id, role_name) values (3, "ラルフ・ジョンソン") on duplicate key update role_id='3', role_name='ラルフ・ジョンソン';
INSERT INTO mst_role (role_id, role_name) values (4, "ジョン・ブリシディース") on duplicate key update role_id='4', role_name='ジョン・ブリシディース';
3. Doma Tool(Eclipseプラグイン)追加 ← 必須ではないらしい
一応、入れておきます。

「作業対象(W):」に「http://dl.bintray.com/domaframework/eclipse/」って入力して、Enter。「Doma」って表示されたら、チェックして、「次へ(N) > 」。

「次へ(N) >」。

「使用条件の条項に同意します(A)」にチェックし、「完了(F)」で。

「インストール(I)」で。

「今すぐ再起動(R)」で。

4.プロジェクトの注釈処理(Annotation processing)の設定
なんか、Eclipseを使う場合は、JARをダウンロードしておく必要があるそうな。
You can pull the jar file of the Doma framework from the Maven central repository. The group id and artifact id are as follows:
| GroupId: | org.seasar.doma |
|---|---|
| ArtifactId: | doma |
See also: https://search.maven.org/artifact/org.seasar.doma/doma/
というわけで、
https://search.maven.org/artifact/org.seasar.doma/doma/
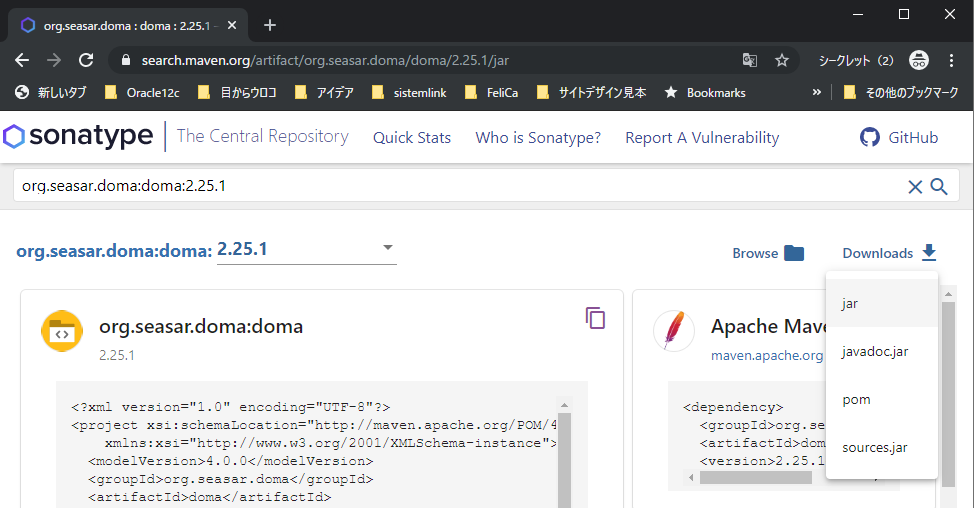
にアクセスして、今回は、「2.25.1」で。build.gradle に追加した依存関係のバージョンと合わせる必要があるようです。
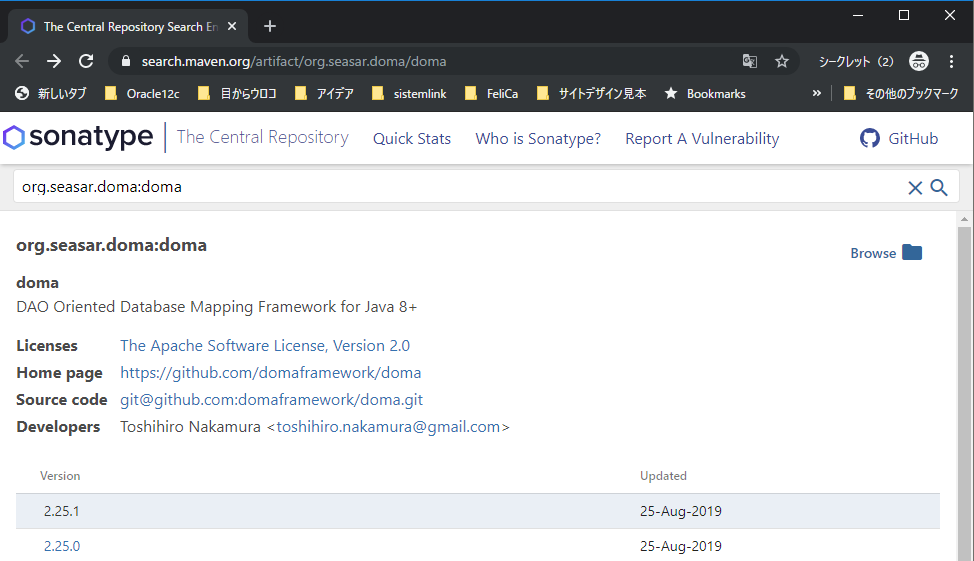
んで、jar をダウンロード。
そしたらば、プロジェクト直下とかに、「lib」ディレクトリを作って配置。

配置し終えたら、プロジェクトを選択し右クリックで、「プロパティー(R)」で、

「Java コンパイラー」>「注釈処理」で、「プロジェクト固有の設定を可能にする(O)」にチェック。

「Java コンパイラー」>「注釈処理」>「ファクトリー・パス」で、「JARの追加(J)...」で、

「lib」ディレクトリに配置していた、doma-2.25.1.jar を選択し、「OK」で。

「適用して閉じる」で。

「はい(Y)」で。

カスタムテンプレート
自動生成されたDaoに@ConfigAutowireableを自動で付与させたいときは作りましょう。自動じゃなくてもいいのであれば必要ありません。
1. doma-genからdao.ftlとlib.ftlを持ってきます。templatePrimaryDirで指定したディレクトリかデフォルトのディレクトリに配置します。
※lib.ftlは空ファイルなので、普通に新規作成してもいいです。
2. dao.ftlで使用するアノテーション名とパッケージのハッシュをlib.ftlに定義します。
⇧ というわけで、カスタムテンプレート配置用のディレクトリ作成で。ファイルも配置で。

ファイルの中身。
/HelloDoma/src/main/resources/config/doma/templates/lib.ftl
<#assign author="k_kawasaki">
<#assign annotationHash={ "ConfigAutowireable": "org.seasar.doma.boot.ConfigAutowireable" }>
/HelloDoma/src/main/resources/config/doma/templates/dao.ftl
<#-- このテンプレートに対応するデータモデルのクラスは org.seasar.doma.extension.gen.DaoDesc です -->
<#import "/lib.ftl" as lib>
<#if lib.copyright??>
${lib.copyright}
</#if>
<#if packageName??>
package ${packageName};
</#if>

<#list importNames as importName>
import ${importName};
</#list>
<#-- ↓追加 ここから -->
<#list lib.annotationHash?values as annotationImportName>
import ${annotationImportName};
</#list>
<#-- ↑追加 ここまで -->
/**
<#if lib.author??>
 * @author ${lib.author}
</#if>
 */

@Dao<#if configClassSimpleName??>(config = ${configClassSimpleName}.class)</#if>
<#-- ↓追加 ここから -->
<#list lib.annotationHash?keys as annotation>
@${annotation}
</#list>
<#-- ↑追加 ここまで -->
public interface ${simpleName} {

<#if entityDesc.idEntityPropertyDescs?size gt 0>
    /**
<#list entityDesc.idEntityPropertyDescs as property>
     * @param ${property.name}
</#list>
     * @return the <#if entityDesc.entityPrefix??>${entityDesc.entityPrefix}</#if>${entityDesc.simpleName}<#if entityDesc.entitySuffix??>${entityDesc.entitySuffix}</#if> entity
     */
    @Select
    <#if entityDesc.entityPrefix??>${entityDesc.entityPrefix}</#if>${entityDesc.simpleName}<#if entityDesc.entitySuffix??>${entityDesc.entitySuffix}</#if> selectById(<#list entityDesc.idEntityPropertyDescs as property>${property.propertyClassSimpleName} ${property.name}<#if property_has_next>, </#if></#list>);

</#if>
<#if entityDesc.idEntityPropertyDescs?size gt 0 && entityDesc.versionEntityPropertyDesc??>
    /**
<#list entityDesc.idEntityPropertyDescs as property>
     * @param ${property.name}
</#list>
     * @param ${entityDesc.versionEntityPropertyDesc.name}
     * @return the <#if entityDesc.entityPrefix??>${entityDesc.entityPrefix}</#if>${entityDesc.simpleName}<#if entityDesc.entitySuffix??>${entityDesc.entitySuffix}</#if> entity
     */
    @Select(ensureResult = true)
    <#if entityDesc.entityPrefix??>${entityDesc.entityPrefix}</#if>${entityDesc.simpleName}<#if entityDesc.entitySuffix??>${entityDesc.entitySuffix}</#if> selectByIdAndVersion(<#list entityDesc.idEntityPropertyDescs as property>${property.propertyClassSimpleName} ${property.name}, </#list>${entityDesc.versionEntityPropertyDesc.propertyClassSimpleName} ${entityDesc.versionEntityPropertyDesc.name});

</#if>
    /**
     * @param entity
     * @return affected rows
     */
    @Insert
    int insert(<#if entityDesc.entityPrefix??>${entityDesc.entityPrefix}</#if>${entityDesc.simpleName}<#if entityDesc.entitySuffix??>${entityDesc.entitySuffix}</#if> entity);

    /**
     * @param entity
     * @return affected rows
     */
    @Update
    int update(<#if entityDesc.entityPrefix??>${entityDesc.entityPrefix}</#if>${entityDesc.simpleName}<#if entityDesc.entitySuffix??>${entityDesc.entitySuffix}</#if> entity);

    /**
     * @param entity
     * @return affected rows
     */
    @Delete
    int delete(<#if entityDesc.entityPrefix??>${entityDesc.entityPrefix}</#if>${entityDesc.simpleName}<#if entityDesc.entitySuffix??>${entityDesc.entitySuffix}</#if> entity);
}
5.Doma-Gen でファイルの自動生成
んで、「Gradle タスク」でDoma-genのタスクを実行が正常に完了したんですが、


ファイルは自動生成されるも、
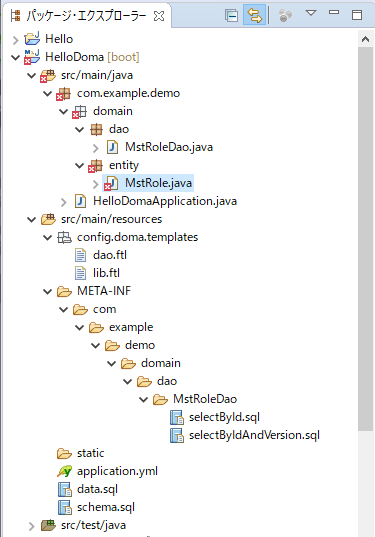
エラーが出ている...

[DOMA4011] The annotation processing for the class "com.example.demo.domain.entity.MstRole" is failed. The cause is as follows: javax.annotation.processing.FilerException: Source file already created: /HelloDoma/.apt_generated/com/example/demo/domain/entity/_MstRole.java
⇧ どうやら、Eclipseの「ウィンドウ(W)」>「設定(P)」から「Java コンパイラー」>「注釈処理」で、「プロジェクト固有の設定を可能にする(O)」にチェックして、

⇧ 「生成されるソース・ディレクトリー(G):」「生成されるテスト・ソース・ディレクトリー(G):」の指定がされてたようで、「build.gradle」のDoma-gen のタスクでも別のディレクトリに生成されるディレクトリーを指定していたのが問題だったような気がするんですが、ハッキリしたことが分からんです...。
っていうか、Doma-gen なくてもDoma2だけで自動生成してくれるってことなのかな?分からん~、分からんことが多過ぎる...。
一旦、「/HelloDoma/.apt_generated/com/example/demo/domain/entity」を削除して、

プロジェクトをクリーンしたら、

エラーは消えました。

⇧ クリーンすると、「/HelloDoma/.apt_generated/com/example/demo/domain/entity/_MstRole.java」がまた作成されるけども...
とりあえず、ファイルはできたということで、ですが、「/HelloDoma/src/main/java/com/example/demo/domain/dao/MstRoleDao.java」は中身がまったくないという...。
このへんは時間のあるときに調査していきたいですかね。
う~ん、いつも思うんだけど、フレームワークとかライブラリって、開発効率を上げるためのはずの存在だと思うんだけど、逆に開発効率を下げるものになってるんではないかって気がしてしまうのは、やっぱり経験が足りないからですかね。
まぁ、何て言うか環境構築系で時間が取られるせいで、肝心のプログラミングの学習がまったくできないし、モチベーションダダ下がりですかね...。
今回も、1ヵ月ちかく浪費したにもかかわらず、モヤモヤしか残らなかった...徒労感が半端ない...
今回はこのへんで。
NG集
依存関係 で、「doma-spring-boot-starter」を、build.gradle に入れずに進めてて泥沼にハマった軌跡を一応載せておきます。
Spring BootでDoma2を使う場合は、必ず、
⇧ のどちらも入れるようにしましょう。
これ気づかずに、1ヶ月ぐらい無駄にしました(涙)
なんか、Doma2のドキュメントにもうちょっと分かりやすく情報を載せてほしいもんだけどって気がしてしまった。
⇩ こっから、駄目駄目なNG集です。
ちなみに、MavenプロジェクトからGradleプロジェクトへの変換が済んでスタートラインに立ったところからです。
⇧ 上記サイト様を参考に、確認してみたところ、親Pomで設定されてるライブラリもあり、Spring Boot 2.2.1 では「freemarker」は既に、親Pomで追加されてるようでした。
ただ、Gradleを使う場合は、「doma-gen-2」に「freemarker」が導入されとるらしいんで、特に「freemarker」の依存関係を追加は不要っぽい。
datasource.gradle、schema.sql、data.sql、application.yml を追加。

んで、 ファイルを編集。値とかは、ご自分の環境に合わせてください。
spring:
  datasource:
    url: jdbc:mysql://localhost:13307/mysql8
#?allowPublicKeyRetrieval=true&useSSL=false
    username: ts0818
    password: mysql
    driver-class-name: com.mysql.cj.jdbc.Driver
# ↓MySQL に接続できなくなる場合の対策
    tomcat:
      testWhileIdle: true
      timeBetweenEvictionRunsMillis: 60000
      validationQuery: SELECT 1

# ↓明示的に初期化を指定しないと、テーブルの初期化とかしてくれない
    initialization-mode: always
# ↓ Doma の設定
# 有効な値:  [DB2, H2, HSQL, MSSQL, MSSQL2008, MYSQL, ORACLE, POSTGRES, SQLITE, STANDARD, db2, h2, hsql, mssql, mssql2008, mysql, oracle, postgres, sqlite, standard]
doma:
  dialect: mysql
# 有効な値: [GREEDY_CACHE, NO_CACHE, greedy-cache, no-cache]
  sql-file-repository: no-cache
application.yml については、domaって部分で、警告が出るんですが、
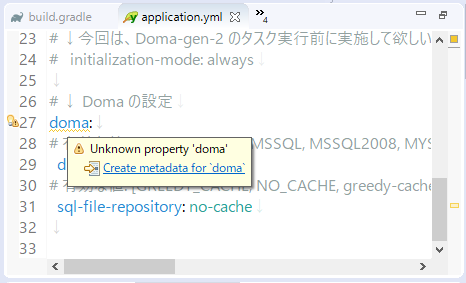
公式には、特に対応方法の記載が無いんですよね、っていうか、そもそも、domaっていうプロパティを、application.properties、ないし、application.yml のどっちについても使うっていう記載が無い...。
ちなみに、Spring Bootの場合は、
よく使われるのはapplication.propertiesやapplication.ymlファイルですよね。
SpringApplicationは、これらのプロパティファイルを以下の場所から探し出します(優先順位高い順):
1./configという名前のサブディレクトリ(file:./config/)
2.カレントディレクトリ(file:./)
3.クラスパスの/configパッケージ(classpath:/config/)
4.クラスパスルート(classpath:/)
⇧ ってことらしく、
...あれ?src/main/resources/じゃないの?
もしそう思ったら、あなたは一人じゃありません。僕も思いました。
実はsrc/main/resourcesディレクトリはMavenのデフォルトのクラスパスの一つです。
そのためsrc/main/resourcesディレクトリは4.クラスパスルートに含まれ、その配下にあるapplication.propertiesファイルはSpring Bootが自動で読み込んでくれます。
⇧ ってことらしく、
もし上記4つ以外の場所からプロパティを読み込ませたい場合は、@Configurationクラスに@PropertySourceアノテーションを付与し、任意のクラスパスを指定してあげるとそこにもプロパティを探しに行ってくれます。
 @Configuration
 @PropertySource("classpath:/com/myco/app.properties")
 public class AppConfig {
⇧ ってことらしい。つまり、プロパティ系のファイルを読み込むパスはデフォルトで決められているから、自分の好きなパスを指定したい時は、自分で設定してあげる必要があると。
はい、脱線しました。
どうも、Pivotalの槙さんがGitHubにサンプルを上げてくれてるんですが、application.propeties だと問題なさそうな感じですかね。
⇧ ただ、使ってるIDEがIntelliJ IDEAっぽい...
一応、自分はEclipseで、application.propeties だと警告は出なかったので、
のどっちかの問題だとは思うんだけど、謎過ぎる...って思ったら、
なんか、分からんけど、
⇧ どうも、STS(Spring Tool Suite)のバグなんじゃないかって..なんか、3.9.5.RELEASEで、issueがcloseされとらんのだが...
ちなみに、Eclipse 2019-09は、STSが内蔵していて、バージョンは4.4.0なんだけど、もしかしてずっとこのissue引きずってんのかな?
一つだけハッキリしたのは、理由は分からんのだけれども、ymlについて「annotation processor」が上手く機能してない?らしいけど、後半の「4.プロジェクトの注釈処理の設定」をすれば解決するかもという期待を込め、一旦、先に進みます。
なんか、Spring Bootでのyaml のプロパティのフォーマットが、kebab-case になったせいで、gradleファイルの中で、「.」で変数を繋げていくのでエラーなっちゃう部分が出てきたんだけど、
Groovy公式ドキュメントでもこの「展開ドット演算子の代入用法」について説明がないので、若干不安なところではありますが、かなり初期の頃からあった隠し仕様のようなので突然廃止されることはないと思います。まあ、その辺はひとつ自己責任でお願いいたします。
⇧ 上記サイト様によりますと、「展開ドット演算子」っていうらしい。
つまり、
ext.driver = yamlObj.spring.datasource.driver-class-name
みたいな書き方ができない...「driver-class-name」みたいにハイフンが含まれたプロパティが処理できないらしい...なんで、Springは、yamlのフォーマットをkebab-case にしたんですかね、Javaのフィールドとも相性良くないでしょうに...
snakeYaml ライブラリ側で対応するのか、Groovy側で対応するのか、どっちにしろSpringの取った方針は迷惑な話 でしかないんですがね。
致し方ないので、ハイフン含むプロパティについては、値を直で代入という...
import org.yaml.snakeyaml.*

buildscript {
    repositories {
        mavenCentral()
    }
    dependencies {
        classpath("org.yaml:snakeyaml:1.25")
    }
}

task datasource {
    Yaml parser = new Yaml()
    ant.loadfile (
        srcfile: 'src/main/resources/application.yml',
        property: 'yaml'
    )
    def yamlObj = parser.load("${ant.properties.yaml}")
    ext.url = yamlObj.spring.datasource.url
    ext.user = yamlObj.spring.datasource.username
    ext.password = yamlObj.spring.datasource.password
    ext.driver = "com.mysql.cj.jdbc.Driver"
}
/*
 * This file was generated by the Gradle 'init' task.
 */

plugins {
    id 'java'
    id 'maven-publish'
    id 'eclipse'
}

repositories {
    mavenLocal()
    maven {
        url "http://repo.maven.apache.org/maven2"
    }
    maven {
        url 'https://oss.sonatype.org/content/repositories/snapshots/'
    }
}

configurations {
    domaGenRuntime
}

dependencies {
    def springBootVersion = "2.2.1.RELEASE"
    def mysqlVersion = "8.0.18"
    implementation (
        "org.springframework.boot:spring-boot-starter-data-jdbc:${springBootVersion}",
        "org.springframework.boot:spring-boot-starter-web:${springBootVersion}"
    )
    testImplementation "org.springframework.boot:spring-boot-starter-test:${springBootVersion}"
    implementation "mysql:mysql-connector-java:${mysqlVersion}"

    // Doma2 に必要な依存関係を追加
    def domaVersion = "2.25.1"
    annotationProcessor "org.seasar.doma:doma:${domaVersion}"
    implementation "org.seasar.doma:doma:${domaVersion}"
}

group = 'com.example'
version = '0.0.1-SNAPSHOT'
description = 'HelloDoma'
sourceCompatibility = '11'

publishing {
    publications {
        maven(MavenPublication) {
            from(components.java)
        }
    }
}

tasks.withType(JavaCompile) {
    options.encoding = 'UTF-8'
}

tasks.eclipse.doFirst {
    File prefs = file(".settings/org.eclipse.buildship.core.prefs")
    if(!prefs.exists()){
        prefs.append('''
            connection.project.dir=
            eclipse.preferences.version=1
            '''.stripIndent())
    }
}

apply from: 'gradle/datasource.gradle'
// JavaクラスとSQLファイルの出力先ディレクトリを同じにする
processResources.destinationDir = compileJava.destinationDir
// Doma-Genでコンパイルより前にSQLファイルを出力先ディレクトリにコピーするために依存関係を逆転する
compileJava.dependsOn processResources

task domaGen {
    group = 'doma-gen'
    doLast {
        def destBaseDir = 'src/main/java/com/example/demo'
        def basePackage = 'com.example.demo.domain'
        def resourceDir = 'src/main/resources'

        ant.taskdef(resource: 'domagentask.properties',
            classpath: configurations.domaGenRuntime.asPath)
         // Doma-Gen のタスク前に、テーブルが無かったら作成
         // ↓ Gradleの公式ドキュメントで、ant.sql の情報が無い...もはや過去の遺産?
        ant.sql(classpath: configurations.domaGenRuntime.asPath,
            driver: "${datasource.driver}",
            url: "${datasource.url}",
            userid: "${datasource.user}",
            password: "${datasource.password}") {
                fileset(dir: "${resourceDir}") {
                  include(name: "schema.sql")
                  //include(name: "data.sql") // ←ファイルの実行順とか制御できないっぽいので...
                }
            }
        // ↓ DRY(Don't Repeat Yourself)に反しまくまってますな...
        ant.sql(classpath: configurations.domaGenRuntime.asPath,
            driver: "${datasource.driver}",
            url: "${datasource.url}",
            userid: "${datasource.user}",
            password: "${datasource.password}") {
                fileset(dir: "${resourceDir}") {
                  //include(name: "schema.sql")
                  include(name: "data.sql")
                }
            }
       ant.gen(url: "${datasource.url}", user: "${datasource.user}", password: "${datasource.password}", templatePrimaryDir: "${resourceDir}/config/doma/templates", tableNamePattern: 'mst_role') {
            entityConfig(packageName: "${basePackage}.entity", useAccessor: false, useListener: false)
            daoConfig(packageName: "${basePackage}.dao", overwrite: true)
            sqlConfig()
        }
    }
}
CREATE DATABASE IF NOT EXISTS mysql8;
USE mysql8;
CREATE TABLE IF NOT EXISTS mst_role
(
    role_id varchar(20) NOT NULL COMMENT '権限ID',
    role_name varchar(100) COMMENT '権限名',
    version int COMMENT 'バージョン',
    insert_user varchar(20) COMMENT '登録ユーザ',
    insert_date datetime COMMENT '登録日時',
    update_user varchar(20) COMMENT '更新ユーザ',
    update_date datetime COMMENT '更新日時',
    PRIMARY KEY (role_id)
) COMMENT = '権限マスタテーブル';
INSERT INTO mst_role (role_id, role_name) values (1, "エーリヒ・ガンマ") on duplicate key update role_id='1', role_name='エーリヒ・ガンマ';
INSERT INTO mst_role (role_id, role_name) values (2, "リチャード・ヘルム") on duplicate key update role_id='2', role_name='リチャード・ヘルム';
INSERT INTO mst_role (role_id, role_name) values (3, "ラルフ・ジョンソン") on duplicate key update role_id='3', role_name='ラルフ・ジョンソン';
INSERT INTO mst_role (role_id, role_name) values (4, "ジョン・ブリシディース") on duplicate key update role_id='4', role_name='ジョン・ブリシディース';
3. Doma Tool(Eclipseプラグイン)追加 ← 必須ではないらしい
一応、入れておきます。

「作業対象(W):」に「http://dl.bintray.com/domaframework/eclipse/」って入力して、Enter。「Doma」って表示されたら、チェックして、「次へ(N) > 」。

「次へ(N) >」。

「使用条件の条項に同意します(A)」にチェックし、「完了(F)」で。

「インストール(I)」で。

「今すぐ再起動(R)」で。

4.プロジェクトの注釈処理(Annotation processing)の設定
なんか、Eclipseを使う場合は、JARをダウンロードしておく必要があるそうな。
You can pull the jar file of the Doma framework from the Maven central repository. The group id and artifact id are as follows:
| GroupId: | org.seasar.doma |
|---|---|
| ArtifactId: | doma |
See also: https://search.maven.org/artifact/org.seasar.doma/doma/
というわけで、
https://search.maven.org/artifact/org.seasar.doma/doma/
にアクセスして、今回は、「2.25.1」で。build.gradle に追加した依存関係のバージョンと合わせる必要があるようです。

んで、jar をダウンロード。

そしたらば、プロジェクト直下とかに、「lib」ディレクトリを作って配置。

配置し終えたら、プロジェクトを選択し右クリックで、「プロパティー(R)」で、

「Java コンパイラー」>「注釈処理」で、「プロジェクト固有の設定を可能にする(O)」にチェック。

「Java コンパイラー」>「注釈処理」>「ファクトリー・パス」で、「JARの追加(J)...」で、

「lib」ディレクトリに配置していた、doma-2.25.1.jar を選択し、「OK」で。

「適用して閉じる」で。

「はい(Y)」で。

んで、application.ymlの警告が、

消えないやんけ~!
⇧ 上記サイト様によりますと、application.yml には限らないと思うけど、yml の設定値で使いたいプロパティ値に関するクラスを作ってあげる必要があると。
プラスアルファで、
If you scroll through the properties, you will see their data type, description, and in some cases their default value. The properties and their attributes are contained in the configuration metadata for Spring Boot. In the Project Explorer expand Maven Dependencies > spring-boot-2.1.3.RELEASE.jar > META-INF. In the META-INF folder, you will see two JSON files.
Spring Boot Application Properties Example | Examples Java Code Geeks - 2019
⇧ プロパティは、上記のファイルで定義されとるんだと。

⇧ 確かに、spring-bootのjarファイルん中身のMETA-INFに、
っておりますね。
んで、独自のカスタム・プロパティを、「.properties」「.yml」みたいなファイルで警告なしで使いたい場合は、
Creating Metadata for a Custom Property
This will create a file additional-spring-configuration-metadata.json under the META-INF folder in your project. Open the file with the JSON editor and edit the description.
Spring Boot Application Properties Example | Examples Java Code Geeks - 2019
⇧ 「additional-spring-configuration-metadata.json」ってファイルにプロパティの設定をして、プロジェクトのMETA-INFディレクトリに配置しないといかんらしい...
で す が、
⇧ サンプルでは、特に、META-INFに「additional-spring-configuration-metadata.json」を配置してなさそうなんすけどね...
ただ、
「doma-spring-boot/doma-spring-boot-autoconfigure/src/main/resources/META-INF/spring.factories」
ってのがおると。
spring.factories って?
@EnableAutoConfigurationには、別のコンフィギュレーションクラスをインポートすることを示すアノテーション(@Import)が指定されており、インポートされるコンフィギュレーションクラスはorg.springframework.boot.autoconfigure.EnableAutoConfigurationImportSelectorクラスの実装によって決まります。EnableAutoConfigurationImportSelectorの実装では、クラスパス上の/META-INF/spring.factoriesよりインポート対象のコンフィギュレーションクラスを取得するようになっており、
⇧ ってありますよと。
そもそも、Spring Framework では、
This chapter covers the Spring Framework implementation of the Inversion of Control (IoC) principle. IoC is also known as dependency injection (DI).
It is a process whereby objects define their dependencies (that is, the other objects they work with) only through constructor arguments, arguments to a factory method, or properties that are set on the object instance after it is constructed or returned from a factory method.
The container then injects those dependencies when it creates the bean. This process is fundamentally the inverse (hence the name, Inversion of Control) of the bean itself controlling the instantiation or location of its dependencies by using direct construction of classes or a mechanism such as the Service Locator pattern.
https://docs.spring.io/spring/docs/current/spring-framework-reference/core.html
⇧ IoC(Inversion of Control:制御の反転)って仕組み(仕様のことかな?)があり、DI(Dependency Injection:依存性注入)と呼ばれることの方が多いんだけど、この仕組みを実装したものが、Spring IoC Container(DIコンテナと呼ばれるらしい) っていうコンテナっちゅうものらしく、
このSpring IoC Container っていうやつは、

In Spring, the objects that form the backbone of your application and that are managed by the Spring IoC container are called beans. A bean is an object that is instantiated, assembled, and otherwise managed by a Spring IoC container. Otherwise, a bean is simply one of many objects in your application. Beans, and the dependencies among them, are reflected in the configuration metadata used by a container.
https://docs.spring.io/spring/docs/current/spring-framework-reference/core.html
⇧ ってあるように、アプリケーションで使用するオブジェクト(具体的に何を指すか明示されとらんし...)を、Bean としてブールしといてくれてるらしいですと。
Spring が起動に時間かかるってのも、このへんが原因なんじゃって気がするんだけど、どうなんだろう?教えて、偉い人。
BeanをDIコンテナに登録するには、Beanの定義となるConfigulation Metadata ってのが必要らしいんだけど、方法は、3つほど存在するらしい。
For information about using other forms of metadata with the Spring container, see:
-
Annotation-based configuration: Spring 2.5 introduced support for annotation-based configuration metadata.
-
Java-based configuration: Starting with Spring 3.0, many features provided by the Spring JavaConfig project became part of the core Spring Framework. Thus, you can define beans external to your application classes by using Java rather than XML files. To use these new features, see the
@Configuration,@Bean,@Import, and@DependsOnannotations.
https://docs.spring.io/spring/docs/current/spring-framework-reference/core.html
⇧ 3つの方法って言うのが、
- xml-based configuration
ってことかと。んで、Spring Boot を使うと、このへんも良しなにやってくれるらしく、アプリケーションの開発者が意識する必要がない、らしいんだけど、Spring Bootで用意されてないものを使おうとすると、このへんを意識しないといけないらしい...
だから、結局のところ、仕組みを知っとかないといけないってことで、学習コストが嵩むな~。
で、改めて、
AutoConfigureは、Springが提供している各種プロジェクト(例えばSpring Framework(Spring MVC), Spring Security, Spring Data, Spring Cloud, Spring Integration, Spring Batchなど)や3rdパーティ製のOSSライブラリなどをSpring上で利用する際に必要となるBean定義を、Spring Bootが自動で行ってくれる仕組みです。「自動で」という表現をしましたが、もうすこし正確に表現すると・・・Spring Bootが予め用意しているAutoConfigure用のBean定義ファイル(コンフィギュレーションクラス)がインポートされ、インポートされたコンフィギュレーションクラスの定義に従ってBean定義が行われます。
⇧ ってな感じで、このAutoConfigure用のクラス(Bean定義ファイル、つまりコンフィギュレーションクラス)ってのが、Spring Bootで用意されてるから、DIコンテナへのBean登録とかを意識する必要がなくなるらしいですと。
なんで、「[プロジェクトと外部の依存関係]/[spring-boot-x.x.x.RELEASE.jar ]/META-INF/spring.factories」っていうのは、あらかじめSpring Bootで用意されてるコンフィギュレーションクラスのリストみたいなもんだと。
「spring.factories」は、Beanの定義となるConfigulation Metadata の一覧ってことにもなるんだとは思うんだけど、
なお、「コンフィギュレーションクラスをインポートする仕組み」や「特定の条件をみたす時だけBean定義を適用する仕組み」自体は、Spring Bootのオリジナル機能ではなく、Spring Frameworkから提供されている機能になります。
⇧ DI(Dependency Injection:依存性注入)が適用できるんであると。
なので、「[プロジェクト]/src/main/resources/META-INF/spring.factories 」を用意して、Spring Bootが用意している「[プロジェクトと外部の依存関係]/[spring-boot-x.x.x.RELEASE.jar ]/META-INF/spring.factories」には準備されてない独自のコンフィギュレーションクラスを追加すれば、AutoConfigureでインポート対象にできるってことかと。
で、結局、application.yml で、カスタム・プロパティを警告なしにするにはどうすれば良いのよ?
@ConfigurationPropertiesを使ったサンプルは後で出てきますが、こちらを使用するとPluggable Annotation Processing APIで
アノテーションからメタデータを生成し(META-INF/spring-configuration-metadata.jsonというファイルができます)、
IDEでコード補完を行うことができるようになります。
⇧ 上記サイト様によりますと、@ConfigurationProperties を付与したプロパティ用のクラスを事前に作っておかないと、Pluggable Annotation Processing API によってspring-configuration-metadata.json が作成されないんだと。
んで、
Pluggable Annotation Processing API とは
Java 1.6 から追加された、コンパイル時にアノテーションを処理するための仕組み。Lombok とか JPA の Metamodel とかで利用されている。
つまり、コンパイル時にアノテーションを読み込んでソースコードを自動生成したりできる。
Java 1.5 でアノテーションが追加されたときに、同様にアノテーションをコンパイル時に処理する仕組みとして Annotation Processing Tool (apt) が追加されていたが、これとは別物らしい。
⇧ んで、Java 1.6 から追加されたんだ~と。
Doma2系のドキュメントにも、
Doma uses Pluggable Annotation Processing API at compile time.
In this document, we describe the options for the annotation processors in Doma and show you how to pass them to build tools.
ってなって、options を用意してますってなってて、方法的には、
- Setting options in Eclipse
- Setting options in IntelliJ IDEA
- Setting options in javac
- Setting options in Gradle
- Setting options with configuration file
⇧ これだけあるらしい。
んで、Eclipseの場合は、
Setting options in Eclipse
⇧ ...殴って良いですか? って言うか、説明が面倒くさいのかもしらんけど、キャプチャを貼ってくれ~って感じ。
Eclipseのプロジェクトを選択した状態で右クリックで、「プロパティ(R)」を選択後の「Java コンパイラー」>「注釈処理」にある、「プロセッサー・オプション(-Akey=値):」を追加してくってことかと。(オプションは特に必須ってわけでもないのかも...ドキュメントに例とかの記載もなかったので、すみません分かりませんでした)

あれ?でも、注釈処理(Annotation processing)の設定したけど?って思った人、ワシもじゃ、ワシもじゃみんな!!
どうやら、Doma2では、Annotation processing の設定を、
- Building an application
- →ビルド時のためのAnnotation processing の設定
- Annotation processing
- →コンパイル時のためのAnnotation processing の設定
の2つで行うということだったらしく、コンパイル時の設定が抜けてたので、解決できなかったらしいってことなのかな?
だから、Spring BootでDoma2を使ったサンプルに、「additional-spring-configuration-metadata.json」が無かったのは、Doma2が Pluggable Annotation Processing API を使ってコンパイル時に 「additional-spring-configuration-metadata.json」を生成するっていう仕様だったということで、そのためには、Eclipseで設定が必要だったと、分かりにくいな~。
なので、Doma2の場合に、appliaction.yml でカスタム・プロパティを使えるようにするのは、ちょっと特殊なのか分からんのだけど、
- プロパティ用のクラス(@ConfigurationPropertiesアノテーションを付与した)を用意しておく
- Pluggable Annotation Processing APIをコンパイル時に機能するようIDEの設定
ってことかと。
プロパティ用のクラスは、
⇧ サンプルの「doma-spring-boot/doma-spring-boot-autoconfigure/src/main/java/org/seasar/doma/boot/autoconfigure/」 以下のJavaファイルを使わせていただくということで。
って思ったんだけど、部分的に使うってのが厳しいと。
Mavenでマルチプロジェクトになってるらしいんで、
⇧ 上記サイト様を参考に、Gradleのマルチプロジェクトとしていこうかと思ったら、pom.xmlで、親プロジェクトを参照してるみたいで、MavenからGradleへの変換をしようとしてエラーになってしまったんだ(他プロジェクトに依存しちゃってるっぽい)で、諦めました。
う~ん、とりあえず、プロパティ用のクラスを用意してコンパイルすれば良いのかな?
と思ったら、
⇧ なんか、「spring-boot-configuration-processor」を依存性に追加って言ってるんだけど、
Doma uses Pluggable Annotation Processing API at compile time.
⇧ Doma2 はこのへんをやってくれているってことなんだと思うから、「spring-boot-configuration-processor」は不要でしょうということで。
んで、プロパティ用のクラスを用意して、

「Gradle タスク」で、build してみたんですが、


コンパイルされて、中間ファイルである「DomaProperties.class」ができたんだけど、

変わらんやんけ~!

う~ン、仕方が無いので、先に進みます。
カスタムテンプレート
自動生成されたDaoに@ConfigAutowireableを自動で付与させたいときは作りましょう。自動じゃなくてもいいのであれば必要ありません。
1. doma-genからdao.ftlとlib.ftlを持ってきます。templatePrimaryDirで指定したディレクトリかデフォルトのディレクトリに配置します。
※lib.ftlは空ファイルなので、普通に新規作成してもいいです。
2. dao.ftlで使用するアノテーション名とパッケージのハッシュをlib.ftlに定義します。
⇧ というわけで、カスタムテンプレート配置用のディレクトリ作成で。ファイルも配置で。

ファイルの中身。
<#assign author="k_kawasaki">
<#assign annotationHash={ "ConfigAutowireable": "org.seasar.doma.boot.ConfigAutowireable" }>
<#-- このテンプレートに対応するデータモデルのクラスは org.seasar.doma.extension.gen.DaoDesc です -->
<#import "/lib.ftl" as lib>
<#if lib.copyright??>
${lib.copyright}
</#if>
<#if packageName??>
package ${packageName};
</#if>

<#list importNames as importName>
import ${importName};
</#list>
<#-- ↓追加 ここから -->
<#list lib.annotationHash?values as annotationImportName>
import ${annotationImportName};
</#list>
<#-- ↑追加 ここまで -->
/**
<#if lib.author??>
 * @author ${lib.author}
</#if>
 */

@Dao<#if configClassSimpleName??>(config = ${configClassSimpleName}.class)</#if>
<#-- ↓追加 ここから -->
<#list lib.annotationHash?keys as annotation>
@${annotation}
</#list>
<#-- ↑追加 ここまで -->
public interface ${simpleName} {

<#if entityDesc.idEntityPropertyDescs?size gt 0>
    /**
<#list entityDesc.idEntityPropertyDescs as property>
     * @param ${property.name}
</#list>
     * @return the <#if entityDesc.entityPrefix??>${entityDesc.entityPrefix}</#if>${entityDesc.simpleName}<#if entityDesc.entitySuffix??>${entityDesc.entitySuffix}</#if> entity
     */
    @Select
    <#if entityDesc.entityPrefix??>${entityDesc.entityPrefix}</#if>${entityDesc.simpleName}<#if entityDesc.entitySuffix??>${entityDesc.entitySuffix}</#if> selectById(<#list entityDesc.idEntityPropertyDescs as property>${property.propertyClassSimpleName} ${property.name}<#if property_has_next>, </#if></#list>);

</#if>
<#if entityDesc.idEntityPropertyDescs?size gt 0 && entityDesc.versionEntityPropertyDesc??>
    /**
<#list entityDesc.idEntityPropertyDescs as property>
     * @param ${property.name}
</#list>
     * @param ${entityDesc.versionEntityPropertyDesc.name}
     * @return the <#if entityDesc.entityPrefix??>${entityDesc.entityPrefix}</#if>${entityDesc.simpleName}<#if entityDesc.entitySuffix??>${entityDesc.entitySuffix}</#if> entity
     */
    @Select(ensureResult = true)
    <#if entityDesc.entityPrefix??>${entityDesc.entityPrefix}</#if>${entityDesc.simpleName}<#if entityDesc.entitySuffix??>${entityDesc.entitySuffix}</#if> selectByIdAndVersion(<#list entityDesc.idEntityPropertyDescs as property>${property.propertyClassSimpleName} ${property.name}, </#list>${entityDesc.versionEntityPropertyDesc.propertyClassSimpleName} ${entityDesc.versionEntityPropertyDesc.name});

</#if>
    /**
     * @param entity
     * @return affected rows
     */
    @Insert
    int insert(<#if entityDesc.entityPrefix??>${entityDesc.entityPrefix}</#if>${entityDesc.simpleName}<#if entityDesc.entitySuffix??>${entityDesc.entitySuffix}</#if> entity);

    /**
     * @param entity
     * @return affected rows
     */
    @Update
    int update(<#if entityDesc.entityPrefix??>${entityDesc.entityPrefix}</#if>${entityDesc.simpleName}<#if entityDesc.entitySuffix??>${entityDesc.entitySuffix}</#if> entity);

    /**
     * @param entity
     * @return affected rows
     */
    @Delete
    int delete(<#if entityDesc.entityPrefix??>${entityDesc.entityPrefix}</#if>${entityDesc.simpleName}<#if entityDesc.entitySuffix??>${entityDesc.entitySuffix}</#if> entity);
}
5.Doma-gen-2 でファイルの自動生成
そしたらば、Doma-gen-2 でファイルを自動生成するために、Gradleのタスクを実行します。
一応、Eclipse 上の「Gradle タスク」のビューが開いてない状態であると仮定して、
「ウィンドウ(W)」>「ビューの表示(V)」>「その他(O)...」で。

「Gradle」>「Gradle タスク」を、「開く(O)」で。

んで、 「doma-gen」の中の「gen」ってタスクを選択して右クリックで、「Gradle タスクの実行」で。(ダブルクリックでも実行できます。下の方の「gen」で実行しました。)

んで、実行結果。

Gradleのタスクは問題なく遂行されて、
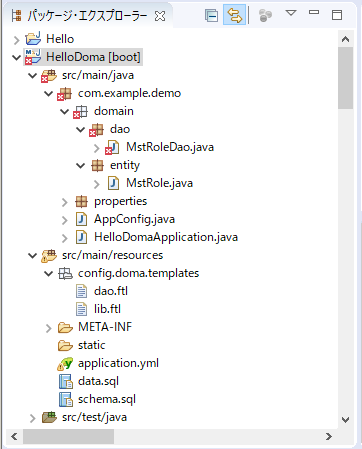
⇧ ファイルの自動生成もされたんですが、
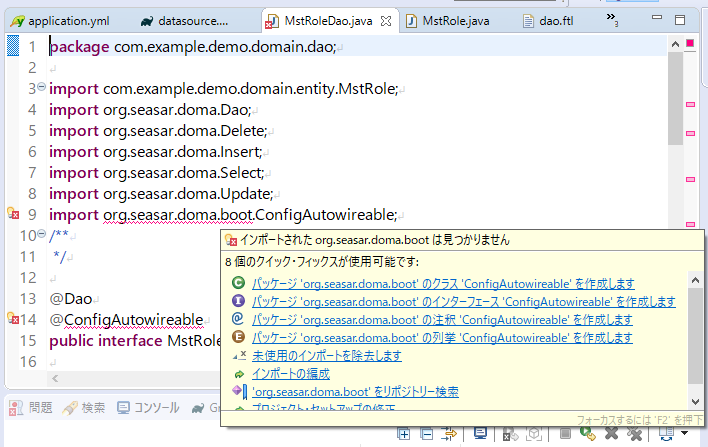
⇧ @ConfigAutowireable が解決できないのは、依存関係に、「doma-spring-boot-starter」が足りないかららしいですと。
Spring BootでDoma2系を使う時は、依存関係に、「doma-spring-boot-starter」も追加するのを忘れずにってことですかね。
ちなみに、「application.yml」の警告も、依存関係に、「doma-spring-boot-starter」も追加することで解決します。
ってことで、何だろうな、頭の良い人たちの作るライブラリのドキュメントってのは私のような頭の悪い人間にとっては、非常に分かりづらいと思ってしまった次第です。
でも、かの偉大な文豪、チャールズ・ブコウスキーは、こう言っております。
An intellectual is a man who says a simple thing in a difficult way.
An artist is a man who says a difficult thing in a simple way.

簡単なことを難しく言うのがインテリ。
難しいことを簡単に表現するのが芸術家。
せめて、心持だけでも芸術家でありたいものですかね。

