GCPの仮想マシン(CentOS 7)にWinSCPで接続してまいりたいと思います。
WinSCPでGCPの仮想マシン(CentOS 7)に接続
WinSCPをインストールしてない場合はインストールしておきます。
・Windowsだけで使える!WinSCPの使い方【初心者向け】 | TechAcademyマガジン
・ macでWinSCP!2017年 mac FTPクラアントの新定番 | mac野郎なのか
・『WinSCP』をMacで使えるようにする方法!! | Webデザイン ABC
それでは、WinSCPを起動します。「ホスト名(H)」にGCPのVMインスタンスの「外部 IP」を指定します。「ユーザー名」はGCPのVMインスタンスのsshログインしたときに表示される「ユーザー名」を指定。「パスワード(P)」は、何でも大丈夫のようです。
「設定(D)...」をクリック。

「秘密鍵(K)」に、前回「Putty Key Generator」で作成した「秘密鍵」を指定します。そうしたら、「OK」。

「保存(s)」しておくと、設定した「セッション」で次回以降も接続できます。

「セッションの保存名(S)」を適当に入力し、「OK」をクリック。

左側に「セッション(接続情報)」が保存されるので、次からはこれを選択してから「ログイン」を押すことで、接続できます。

もし、作成した「セッション」を削除したい場合ときなどは、「管理(M)」からいけます。

「ログイン」をクリック。

初回のみ警告が出ますが、「はい(Y)」を選択します。

前回「Putty Key Generator」で決めた「Key passphrase」を入力します。


さっそく、前回作成したwarファイルをアップしましょう。
ドラッグ&ドロップでローカル環境のファイルを、いざ!

エラー!嫌な予感はしたけど、エラー!
/opt フォルダの権限があれですかね?

試しに、左側で「/ <ルート>」を選択して、右側の「opt」上で右クリックし、 「プロパティ(P)」を選択。

おんや?「パーミッション」が「755」なので問題なさそう...。

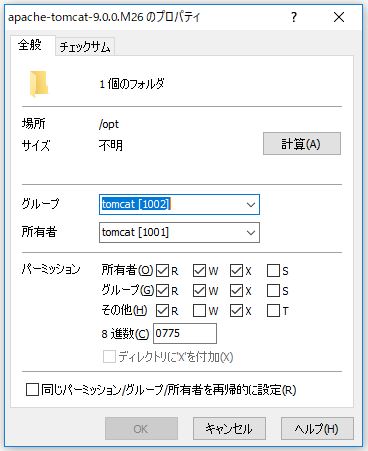
んじゃ、「apache-tomcat-9.0.0.M26」かいな?

おんや?問題なさそうですね。


う~ん、問題なさそう。
んじゃ、webappsっすかね。

いけてそう...今回も泥沼な予感が....。
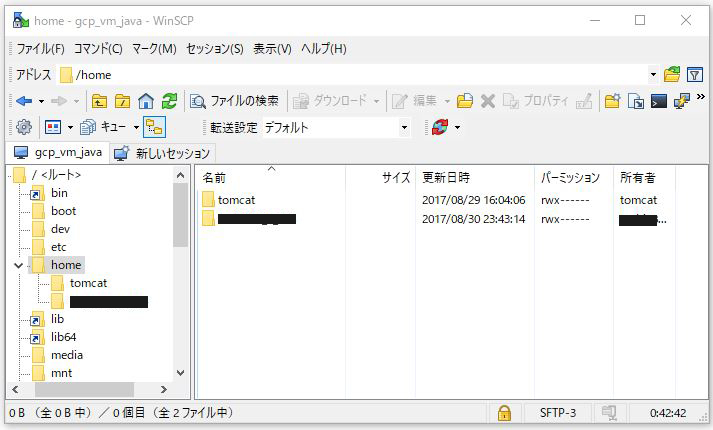
とりあえず、フォルダの表示形式を変えて、「パーミッション」が見れるようにしときます。

と思ったら、「パーミッション」が「775」以上じゃないとアップできないみたいなので、やはり、「opt」で弾かれてるってことですかね?「webapps」も「755」だし...。
Linuxにおけるファイルのアクセス権
| 意味 | ローマ字表記 | 数字表記 | 説明 |
|---|---|---|---|
| 読み取り | r | 4 | ディレクトリ内の一覧表示が可能 |
| 書き込み | w | 2 | ディレクトリ内でファイルの作成/変更/削除が可能 |
| 実行 | x | 1 | ディレクトリ内のファイルにアクセスが可能 |
どうやら、アップロードするってことは、ファイルを作成するってことになる?ということで、書き込み権限(w)が必要になるようです。
試しに、「/home/ユーザー名」 のフォルダにアップは問題なくいけました。

これは、アップロード先のフォルダの「所有者」がGCPのVMインスタンスの「ユーザー名」で、WinScpでログインしてる「ユーザー名」と一致してるため、「パーミッション」が「rwx」として処理されるため、「w(書き込み権限)」があるためアップロードができるのだと思われます。

「opt」の「所有者」が「root」になってます。「home」の「所有者」も「root」になってます。

「/home/ユーザー名」と「/opt/apache-tomcat-9.0.0.26M/webapps」の違いは、「/ユーザー名」と「/apache-tomcat-9.0.0.26M/webapps」の権限の違いで判断していくことになるかとおもわれますが、「/apache-tomcat-9.0.0.26M」にもアップできなかったので、「所有者」が「tomcat」から見れば、「ユーザー名」は「その他」とかになるからか?と思われます。そのため、「r(読み込み権限)」しかないため、アップできない感じになるのかと。

「webapps」も「所有者」が「tomcat」で、「その他」の「パーミッション」が「r-x」となっていて、書き込みの権限がないのが問題でアップができなかったのかと。
こちらも、WinScpでのログインで「ユーザー名」をGCPのVMインスタンスの「ユーザー名」にしているので、「所有者」が「tomcat」から見れば、「ユーザー名」は「その他」とかになるからか?と思われます。

「所有者」「グループ」「その他」の関係の調べ方が分からないので、推測の域を出ることはないのですが、WinScpのログイン時の「ユーザー名」と接続先(ここではGCPのVMインスタンス、CentOS 7)の「所有者」は関連してるってことかと思われます。
とりあえず、GCPのVMインスタンスのほうにsshログインし、「/home/ユーザー名」に配置したwarファイルを、「/opt/apache-tomcat-9.0.0.26M/webapps」に移動する方向で。せっかくなんで、putty.exeでsshしてみます。


「Host Name(or IP address)」にGCPのVMインスタンスの「外部 IP」を指定。

「Connection」>「SSH」>「Auth」の「Private key file for authenticatin:」でGCPのVMインスタンス接続用に作成した「秘密鍵」(『C:¥Users¥ユーザー名¥.ssh』フォルダにあるかと)を指定し、「Open」をクリック。

「login as: 」に「ユーザー名」(「Putty Key Generator」の「Key Comment」で決めたもの)を入力しEnter。そのあと、「Passphrase」を聞かれるので、「Putty Key Generator」で決めた「Key passphrase」を入力し、Enter。

warファイルを移動しようとして怒られるので、
mv /home/toshi888_8_888/FS6Project_suzuki.war /opt/tomcat/webapps/FS6Project_suzuki.war

sudoをつけて「スーパユーザー」として実行。
sudo mv /home/toshi888_8_888/FS6Project_suzuki.war /opt/tomcat/webapps/FS6Project_suzuki.war

移動できました。Tomcatを起動すれば自動で、warファイルが展開されるらしいので、
・Eclipseでwarファイルを作成し、Tomcatにデプロイする手順 | ITSakura
Tomcatを起動します。
sudo su
systemctl start tomcat

無事、warファイルが展開され、「FS6Project_suzuki」プロジェクトが!

ちょっと脱線して、前から気になっていたTomcatのserviceの状態が「active(exited)」ってなってるけど、これは正常なのだろうか?
・CentOS 7で始める最新Linux管理入門(2):CentOS 7のシステム管理「systemd」をイチから理解する (2/4) - @IT
によると、「systemctl list-unitsコマンド」で、CentOS 7で有効化されているUnitを一覧表示してくれるようなので、
systemctl list-units | grep tomcat
で確認すると、
| 番号 | 名前 | 説明 | 値 |
|---|---|---|---|
| ① | UNIT | ユニット名 | tomcat.service |
| ② | LOAD | Systemdへの設定読み込み状況 | loaded |
| ③ | ACTIVE | Unitの実行状態(ACTIVEは起動しているか否か) | active |
| ④ | SUB | Unitの実行状態(SUBは稼働中や待ち受け中などの各Unitの状態) | exited |
| ⑤ | DESCRIPTION | Unitの概要 | Apache Tomcat 9 |

ということらしい。 「SUB 」の状態以外は良さげに見える。
serviceの中には、デーモンプロセスとして起動したままになるものと、必要な処理を実行して終了するものがあります。「SUB」が「running」のものは、デーモンとして起動中のもので、「exited」は必要な処理が終了した状態のものです。
「exited」は「必要な処理が終了した状態 」らしいけど、Tomcatの場合それで良いのかの判断がつかない。が、とりあえず、無事、プロジェクトは配置できました。

「nginx」「Apache Tomcat」を起動して、ブラウザで確認してみます。

はい、エラー。

やる気を根こそぎ持っていかれますな...まぁ、でも、Nginxが起動してリバースプロキシでTomcatまで処理は来てるようですね。
権限を確認してみると、
ll /opt/tomcat/webapps
total 7684
drwxr-xr-x. 14 tomcat         tomcat            4096 Aug 26 12:09 docs
drwxr-xr-x.  6 tomcat         tomcat              78 Aug 26 12:09 examples
drwxr-x---. 10 tomcat         tomcat            4096 Sep  1 00:54 FS6Project_suzuki
-rw-rw-r--.  1 ユーザー名 ユーザー名 7855034 Aug 30 14:43 FS6Project_suzuki.war
drwxr-xr-x.  5 tomcat         tomcat              82 Aug 26 12:09 host-manager
drwxr-xr-x.  5 tomcat         tomcat              97 Aug 26 12:09 manager
drwxr-xr-x.  3 tomcat         tomcat            4096 Aug 26 12:09 ROOT

表示ができた「examples」プロジェクトは「rwxr-xr-x.」、今回配置した「FS6Project_suzuki」プロジェクトは「rwxr-x---.」と権限が違ってます。(先頭は「ファイルタイプ」を表し、「d」はフォルダであるということらしいです。)
| 文字 | 意味 |
|---|---|
| - | ファイル |
| d | ディレクトリ(フォルダ) |
| l | シンボリックリンク |
・rwxr-xr-xって何?パーティション?Linuxの基本コマンド「ls」の見方
「所有者」「グループ」は両プロジェクトともに「tomcat」になっています。
プロジェクトの中身の権限も比較してみます。
[root@instance-1 ユーザー名]# ll /opt/tomcat/webapps/examples
total 12
-rw-r--r--.  1 tomcat tomcat 1126 Aug  2 20:32 index.html
drwxr-xr-x. 21 tomcat tomcat 4096 Aug 26 12:09 jsp
drwxr-xr-x.  4 tomcat tomcat 4096 Aug 26 12:09 servlets
drwxr-xr-x.  7 tomcat tomcat   76 Aug 26 12:09 WEB-INF
drwxr-xr-x.  2 tomcat tomcat   98 Aug 26 12:09 websocket
[root@instance-1 ユーザー名]# ll /opt/tomcat/webapps/FS6Project_suzuki
total 20
drwxr-x---. 3 tomcat tomcat   59 Sep  1 00:54 css
drwxr-x---. 4 tomcat tomcat 4096 Sep  1 00:54 file
drwxr-x---. 2 tomcat tomcat 4096 Sep  1 00:54 image
-rw-r-----. 1 tomcat tomcat 6864 Aug 22 23:56 index.jsp
drwxr-x---. 3 tomcat tomcat   27 Sep  1 00:54 js
drwxr-x---. 5 tomcat tomcat   96 Sep  1 00:54 jsp
drwxr-x---. 2 tomcat tomcat   42 Sep  1 00:54 META-INF
drwxr-x---. 4 tomcat tomcat   44 Sep  1 00:54 WEB-INF
drwxr-x---. 8 tomcat tomcat 4096 Sep  1 00:54 weblibrary

こちらも、権限が「drwxr-xr-x.」と「drwxr-x---.」で違っています。
ちなみに、権限の対応表は、
| アクセス権 | 2進数表記 | 8進数表記 |
|---|---|---|
| rwx | 111 | 7 |
| rw- | 110 | 6 |
| r-x | 101 | 5 |
| r-- | 100 | 4 |
| -wx | 011 | 3 |
| -w- | 010 | 2 |
| --x | 001 | 1 |
| --- | 000 | 0 |
この表から、
このことから、「rwxr-xr-x」というアクセス権は8進数表記で「755」と表されることが分かります。
となるそうです。
まぁ、まずは「FS6Project_suzuki」フォルダの権限を 「examples」フォルダと同じ「rwxr-xr-x.」に変更してみます。
chmod 755 /opt/tomcat/webapps/FS6Project_suzuki

確認。
[root@instance-1 ユーザー名]# ls -l /opt/tomcat/webapps
total 7684
drwxr-xr-x. 14 tomcat         tomcat            4096 Aug 26 12:09 docs
drwxr-xr-x.  6 tomcat         tomcat              78 Aug 26 12:09 examples
drwxr-xr-x. 10 tomcat         tomcat            4096 Sep  1 00:54 FS6Project_suzuki
-rw-rw-r--.  1 ユーザー名 ユーザー名 7855034 Aug 30 14:43 FS6Project_suzuki.war
drwxr-xr-x.  5 tomcat         tomcat              82 Aug 26 12:09 host-manager
drwxr-xr-x.  5 tomcat         tomcat              97 Aug 26 12:09 manager
drwxr-xr-x.  3 tomcat         tomcat            4096 Aug 26 12:09 ROOT

権限が変更できたので、TomcatとNginxを再起動します。
systemctl stop tomcat
nginx -s stop
systemctl start tomcat
nginx

ブラウザ確認。

はい、変わらずエラー。

このパターンはヤバイっすね、泥沼パターン突入っす(涙)。
・Tomcatのwarファイルとデプロイと自動展開 - ろば電子が詰まっている
⇧ によりますと、「/opt/tomcat/conf/server.xml」で定義されている「unpackWARs」と「autoDeploy」はどちらもデフォルトではtrueになっていて、「unpackWARs」が自動的にwarファイルを展開、「autoDeploy」がTomcat動作中に自動的にアプリケーションをデプロイしてくれるようです。
<Server port="8005" shutdown="SHUTDOWN">
  <Listener className="org.apache.catalina.startup.VersionLoggerListener" />
  <!-- Security listener. Documentation at /docs/config/listeners.html
  <Listener className="org.apache.catalina.security.SecurityListener" />
  -->
  <!--APR library loader. Documentation at /docs/apr.html -->
  <Listener className="org.apache.catalina.core.AprLifecycleListener" SSLEngine="on" />
  <!-- Prevent memory leaks due to use of particular java/javax APIs-->
  <Listener className="org.apache.catalina.core.JreMemoryLeakPreventionListener" />
  <Listener className="org.apache.catalina.mbeans.GlobalResourcesLifecycleListener" />
  <Listener className="org.apache.catalina.core.ThreadLocalLeakPreventionListener" />

  <!-- Global JNDI resources
       Documentation at /docs/jndi-resources-howto.html
  -->
  <GlobalNamingResources>
    <!-- Editable user database that can also be used by
         UserDatabaseRealm to authenticate users
    -->
    <Resource name="UserDatabase" auth="Container"
              type="org.apache.catalina.UserDatabase"
              description="User database that can be updated and saved"
              factory="org.apache.catalina.users.MemoryUserDatabaseFactory"
              pathname="conf/tomcat-users.xml" />
  </GlobalNamingResources>

  <!-- A "Service" is a collection of one or more "Connectors" that share
       a single "Container" Note:  A "Service" is not itself a "Container",
       so you may not define subcomponents such as "Valves" at this level.
       Documentation at /docs/config/service.html
   -->
  <Service name="Catalina">

    <!--The connectors can use a shared executor, you can define one or more named thread pools-->
    <!--
    <Executor name="tomcatThreadPool" namePrefix="catalina-exec-"
        maxThreads="150" minSpareThreads="4"/>
    -->


    <!-- A "Connector" represents an endpoint by which requests are received
         and responses are returned. Documentation at :
         Java HTTP Connector: /docs/config/http.html
         Java AJP  Connector: /docs/config/ajp.html
         APR (HTTP/AJP) Connector: /docs/apr.html
         Define a non-SSL/TLS HTTP/1.1 Connector on port 8080
    -->
    <Connector port="8080" protocol="HTTP/1.1"
               connectionTimeout="20000"
               redirectPort="8443" />
    <!-- A "Connector" using the shared thread pool-->
    <!--
    <Connector executor="tomcatThreadPool"
               port="8080" protocol="HTTP/1.1"
               connectionTimeout="20000"
               redirectPort="8443" />
    -->
    <!-- Define a SSL/TLS HTTP/1.1 Connector on port 8443
         This connector uses the NIO implementation. The default
         SSLImplementation will depend on the presence of the APR/native
         library and the useOpenSSL attribute of the
         AprLifecycleListener.
         Either JSSE or OpenSSL style configuration may be used regardless of
         the SSLImplementation selected. JSSE style configuration is used below.
    -->
    <!--
    <Connector port="8443" protocol="org.apache.coyote.http11.Http11NioProtocol"
               maxThreads="150" SSLEnabled="true">
        <SSLHostConfig>
            <Certificate certificateKeystoreFile="conf/localhost-rsa.jks"
                         type="RSA" />
        </SSLHostConfig>
    </Connector>
    -->
    <!-- Define a SSL/TLS HTTP/1.1 Connector on port 8443 with HTTP/2
         This connector uses the APR/native implementation which always uses
         OpenSSL for TLS.
         Either JSSE or OpenSSL style configuration may be used. OpenSSL style
         configuration is used below.
    -->
    <!--
    <Connector port="8443" protocol="org.apache.coyote.http11.Http11AprProtocol"
               maxThreads="150" SSLEnabled="true" >
        <UpgradeProtocol className="org.apache.coyote.http2.Http2Protocol" />
        <SSLHostConfig>
            <Certificate certificateKeyFile="conf/localhost-rsa-key.pem"
                         certificateFile="conf/localhost-rsa-cert.pem"
                         certificateChainFile="conf/localhost-rsa-chain.pem"
                         type="RSA" />
        </SSLHostConfig>
    </Connector>
    -->

    <!-- Define an AJP 1.3 Connector on port 8009 -->
    <Connector port="8009" protocol="AJP/1.3" redirectPort="8443" />


    <!-- An Engine represents the entry point (within Catalina) that processes
         every request.  The Engine implementation for Tomcat stand alone
         analyzes the HTTP headers included with the request, and passes them
         on to the appropriate Host (virtual host).
         Documentation at /docs/config/engine.html -->

    <!-- You should set jvmRoute to support load-balancing via AJP ie :
    <Engine name="Catalina" defaultHost="localhost" jvmRoute="jvm1">
    -->
    <Engine name="Catalina" defaultHost="localhost">

      <!--For clustering, please take a look at documentation at:
          /docs/cluster-howto.html  (simple how to)
          /docs/config/cluster.html (reference documentation) -->
      <!--
      <Cluster className="org.apache.catalina.ha.tcp.SimpleTcpCluster"/>
      -->

      <!-- Use the LockOutRealm to prevent attempts to guess user passwords
           via a brute-force attack -->
      <Realm className="org.apache.catalina.realm.LockOutRealm">
        <!-- This Realm uses the UserDatabase configured in the global JNDI
             resources under the key "UserDatabase".  Any edits
             that are performed against this UserDatabase are immediately
             available for use by the Realm.  -->
        <Realm className="org.apache.catalina.realm.UserDatabaseRealm"
               resourceName="UserDatabase"/>
      </Realm>

      <Host name="localhost"  appBase="webapps"
            unpackWARs="true" autoDeploy="true">

        <!-- SingleSignOn valve, share authentication between web applications
             Documentation at: /docs/config/valve.html -->
        <!--
        <Valve className="org.apache.catalina.authenticator.SingleSignOn" />
        -->

        <!-- Access log processes all example.
             Documentation at: /docs/config/valve.html
             Note: The pattern used is equivalent to using pattern="common" -->
        <Valve className="org.apache.catalina.valves.AccessLogValve" directory="logs"
               prefix="localhost_access_log" suffix=".txt"
               pattern="%h %l %u %t "%r" %s %b" />

      </Host>
    </Engine>
  </Service>
</Server>
たしかに、最後のほうの「<Host name="localhost" appBase="webapps" unpackWARs="true" autoDeploy="true">」のところで、両方ともtrueになってます。
ですが、読み込まれない!
というか、Tomcatのデフォルトのページも表示されなかったのは、
・インフラエンジニアのメモ : Tomcat7のManager(管理画面)にアクセスできない
⇧ によりますと、やはり権限の問題だったようです。tomcatをインストールしたフォルダまで移動し、sudo suでスーパユーザーに切り替わります。(「sudo su」は引数を省略すると「スーパユーザー(root)」になるみたいです。「sudo su ユーザー名」とかだと「ユーザー名」に切り替わります。)
「find . -uid 0」でrootユーザ所有のファイル・ディレクトリを探せるみたい。
cd /opt/tomcat
sudo su
find . -uid 0

見つかったので、
chown -R tomcat ./

Tomcat実行ユーザに変更します。Tomcat、Nginxを再起動し、
systemctl stop tomcat
nginx -s stop
nginx
systemctl start tomcat

ブラウザで『http://外部 IP/』にアクセスすると、ようやく猫が!表示、長い道のりじゃった。

そして、warファイルから展開されたプロジェクトも無事表示されました!公開できました!(まだ、MySQLのデータをインポートしてないですが...)

ここからは、Tomcatのトップページから管理系の画面(「manager」や「host-manager」などのページ)に入るための設定です。
・インフラエンジニアのメモ : Tomcat7のManager(管理画面)にアクセスできない
・Install Apache Tomcat 9 on CentOS 7 / RHEL 7 / Ubuntu 16.04
⇧ によると、
デフォルトでは、ユーザまたはアカウントは、マネージャGUIページおよび管理ページにアクセスできません。したがって、ユーザーにアクセスを許可するには、 "/opt/tomcat/conf/tomcat-users.xml"ファイルの中の<tomcat-users>タグの中に次の行を追加します。
<!-- User linuxtechi who can access only manager section -->
<role rolename="manager-gui" />
<user username="linuxtechi" password="<Enter-Secure-Password>" roles="manager-gui" />

<!-- User Admin Who can access manager and admin section both -->
<role rolename="admin-gui" />
<user username="admin" password="<Enter-Secure-Password>" roles="admin-gui" />
実際に、「/opt/tomcat/conf/tomcat-users.xml」ファイルを開いてみます。
vi /opt/tomcat/conf/tomcat-users.xml
以下のような内容になっているので、
<?xml version="1.0" encoding="UTF-8"?>
<!--
  Licensed to the Apache Software Foundation (ASF) under one or more
  contributor license agreements.  See the NOTICE file distributed with
  this work for additional information regarding copyright ownership.
  The ASF licenses this file to You under the Apache License, Version 2.0
  (the "License"); you may not use this file except in compliance with
  the License.  You may obtain a copy of the License at

      http://www.apache.org/licenses/LICENSE-2.0

  Unless required by applicable law or agreed to in writing, software
  distributed under the License is distributed on an "AS IS" BASIS,
  WITHOUT WARRANTIES OR CONDITIONS OF ANY KIND, either express or implied.
  See the License for the specific language governing permissions and
  limitations under the License.
-->
<tomcat-users xmlns="http://tomcat.apache.org/xml"
              xmlns:xsi="http://www.w3.org/2001/XMLSchema-instance"
              xsi:schemaLocation="http://tomcat.apache.org/xml tomcat-users.xsd"
              version="1.0">
<!--
  NOTE:  By default, no user is included in the "manager-gui" role required
  to operate the "/manager/html" web application.  If you wish to use this app,
  you must define such a user - the username and password are arbitrary. It is
  strongly recommended that you do NOT use one of the users in the commented out
  section below since they are intended for use with the examples web
  application.
-->
<!--
  NOTE:  The sample user and role entries below are intended for use with the
  examples web application. They are wrapped in a comment and thus are ignored
  when reading this file. If you wish to configure these users for use with the
  examples web application, do not forget to remove the <!.. ..> that surrounds
  them. You will also need to set the passwords to something appropriate.
-->
<!--
  <role rolename="tomcat"/>
  <role rolename="role1"/>
  <user username="tomcat" password="<must-be-changed>" roles="tomcat"/>
  <user username="both" password="<must-be-changed>" roles="tomcat,role1"/>
  <user username="role1" password="<must-be-changed>" roles="role1"/>
-->
</tomcat-users>
<tomcat-users>タグの前に、さきほどのサイトで言われていたタグを追加します。
<?xml version="1.0" encoding="UTF-8"?>
<!--
  Licensed to the Apache Software Foundation (ASF) under one or more
  contributor license agreements.  See the NOTICE file distributed with
  this work for additional information regarding copyright ownership.
  The ASF licenses this file to You under the Apache License, Version 2.0
  (the "License"); you may not use this file except in compliance with
  the License.  You may obtain a copy of the License at

      http://www.apache.org/licenses/LICENSE-2.0

  Unless required by applicable law or agreed to in writing, software
  distributed under the License is distributed on an "AS IS" BASIS,
  WITHOUT WARRANTIES OR CONDITIONS OF ANY KIND, either express or implied.
  See the License for the specific language governing permissions and
  limitations under the License.
-->


<tomcat-users xmlns="http://tomcat.apache.org/xml"
              xmlns:xsi="http://www.w3.org/2001/XMLSchema-instance"
              xsi:schemaLocation="http://tomcat.apache.org/xml tomcat-users.xsd"
              version="1.0">
<!--
  NOTE:  By default, no user is included in the "manager-gui" role required
  to operate the "/manager/html" web application.  If you wish to use this app,
  you must define such a user - the username and password are arbitrary. It is
  strongly recommended that you do NOT use one of the users in the commented out
  section below since they are intended for use with the examples web
  application.
-->
<!--
  NOTE:  The sample user and role entries below are intended for use with the
  examples web application. They are wrapped in a comment and thus are ignored
  when reading this file. If you wish to configure these users for use with the
  examples web application, do not forget to remove the <!.. ..> that surrounds
  them. You will also need to set the passwords to something appropriate.
-->
<!--
  <role rolename="tomcat"/>
  <role rolename="role1"/>
  <user username="tomcat" password="<must-be-changed>" roles="tomcat"/>
  <user username="both" password="<must-be-changed>" roles="tomcat,role1"/>
  <user username="role1" password="<must-be-changed>" roles="role1"/>
-->

<!-- User linuxtechi who can access only manager section --> <role rolename="manager-gui" /> <user username="適当なユーザー名" password="適当なパスワード" roles="manager-gui" /> <!-- User Admin Who can access manager and admin section both --> <role rolename="admin-gui" /> <user username="適当なユーザー名" password="適当なパスワード" roles="admin-gui" />

</tomcat-users>
Tomcatを再起動します。
「http://外部 IP/manager/html」にアクセスすると、「ユーザー名」と「パスワード」を求められるので、「/opt/tomcat/conf/tomcat-users.xml」で追記した「rolename」が「manager-gui」で設定した「username」「password」を入力します。

「http://外部 IP/manager/html」のページにアクセスできました!

今回もハマりにハマりましたが、なんとか公開するところまでいけました。
データベースにデータをインポートしてインポートしたデータベースと連携するところもやっていきたいと思います。
・【一通り理解】Linuxパーミッションの基本とその設定方法
今回はこのへんで。